Developer Guide
- Setting up, getting started
- Design
-
Implementation
- Autocomplete Feature
- Fuzzy Find Completion Feature (Fzf)
- Clearing all Contacts
- Listing all Contacts
- Deleting Contacts
- Copying Email Address/Phone Number of Contacts
- Finding Contacts
- Tagging Contacts
- Adding a Module
-
Editing a Module
- Implementation
- Parsing the user input
-
Executing the user input
- Check if model contains given module
- If the name of the module is changed, check if the new name already exists within the model
- If the participants of the module are changed, Check if the new participants exist in the model
- Check if edited module is the same as original module
- Check if the modules relevant meetings have no participants
- Activity Diagram
- Implementation
- Parsing the user input
- Executing the user input
- Activity Diagram
- Listing Contacts in a Module
- Adding a Meeting
- Deleting a Meeting
- Editing a Meeting
- Viewing a Specific Meeting’s Agendas and Notes
- Timeline Feature
- Theme switch feature
- Documentation, logging, testing, configuration, dev-ops
- Appendix: Requirements
- Appendix: Instructions for manual testing
Setting up, getting started
Refer to the guide Setting up and getting started.
Design
Architecture

The Architecture Diagram given above explains the high-level design of the App. Given below is a quick overview of each component.
.puml files used to create diagrams in this document can be found in the diagrams folder. Refer to the PlantUML Tutorial at se-edu/guides to learn how to create and edit diagrams.
Main has two classes called Main and MainApp. It is responsible for,
- At app launch: Initializes the components in the correct sequence, and connects them up with each other.
- At shut down: Shuts down the components and invokes cleanup methods where necessary.
Commons represents a collection of classes used by multiple other components.
The rest of the App consists of four components.
-
UI: The UI of the App. -
Logic: The command executor. -
Model: Holds the data of the App in memory. -
Storage: Reads data from, and writes data to, the hard disk.
Each of the four components,
- defines its API in an
interfacewith the same name as the Component. - exposes its functionality using a concrete
{Component Name}Managerclass (which implements the corresponding APIinterfacementioned in the previous point.
For example, the Logic component (see the class diagram given below) defines its API in the Logic.java interface and exposes its functionality using the LogicManager.java class which implements the Logic interface.

How the architecture components interact with each other
The Sequence Diagram below shows how the components interact with each other for the scenario where the user issues the command contact delete Alex Yeoh.

The sections below give more details of each component.
UI component

API :
Ui.java
The UI consists of a MainWindow that is made up of parts e.g.CommandBox, ResultDisplay, PersonListPanel, StatusBarFooter etc. All these, including the MainWindow, inherit from the abstract UiPart class.
The UI component uses JavaFx UI framework. The layout of these UI parts are defined in matching .fxml files that are in the src/main/resources/view folder. For example, the layout of the MainWindow is specified in MainWindow.fxml
The UI component,
- Executes user commands using the
Logiccomponent. - Listens for changes to
Modeldata so that the UI can be updated with the modified data.
Logic component

API :
Logic.java
-
Logicuses theAddressBookParserclass to parse the user command. - This results in a
Commandobject which is executed by theLogicManager. - The command execution can affect the
Model(e.g. adding a person). - The result of the command execution is encapsulated as a
CommandResultobject which is passed back to theUi. - In addition, the
CommandResultobject can also instruct theUito perform certain actions, such as displaying help to the user.
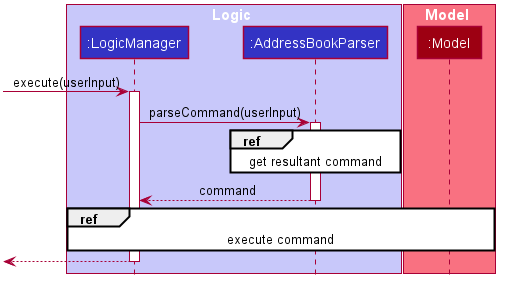
Given below is the Sequence Diagram for interactions within the Logic component for any user input.
Given below are the Sequence Diagrams for the execute("contact delete Alex Yeoh") API call.
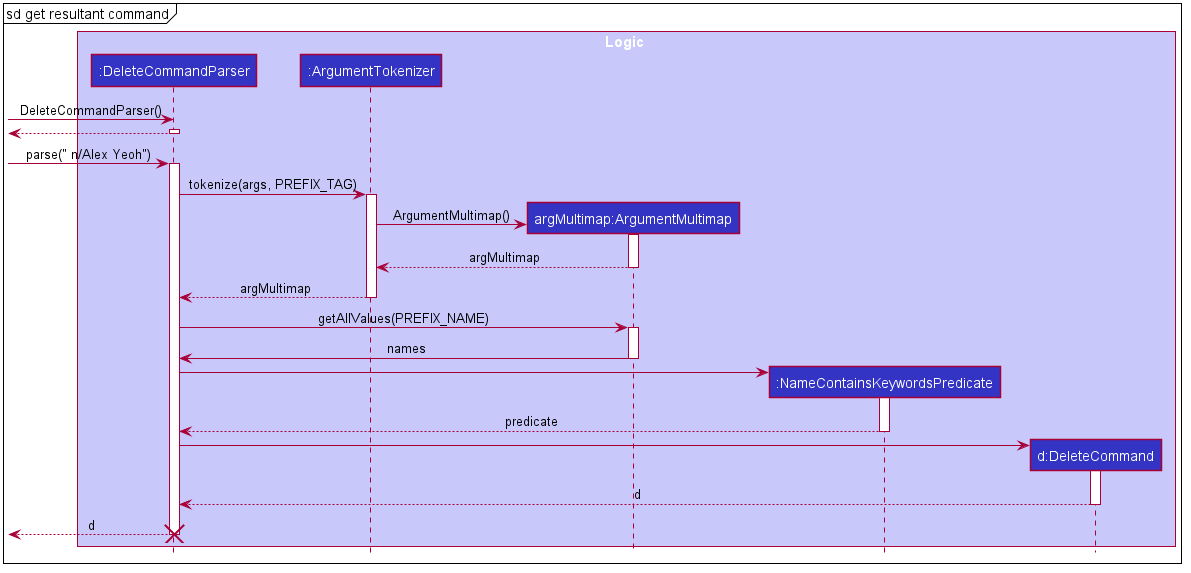
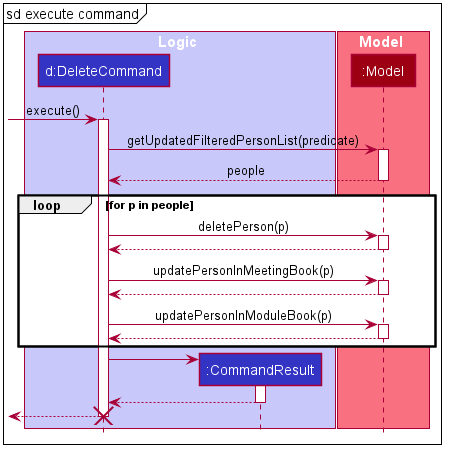
DeleteCommandParser should end at the destroy marker (X) but due to a limitation of PlantUML, the lifeline reaches the end of diagram.
Model component

API : Model.java
The Model,
- stores a
UserPrefobject that represents the user’s preferences. - stores the address book data.
- exposes an unmodifiable
ObservableList<Person>that can be ‘observed’ e.g. the UI can be bound to this list so that the UI automatically updates when the data in the list change. - does not depend on any of the other three components.
Tag list in the AddressBook, which Person references. This allows AddressBook to only require one Tag object per unique Tag, instead of each Person needing their own Tag object.
Storage component

API : Storage.java
The Storage component,
- can save
UserPrefobjects in json format and read it back. - can save the address book data in json format and read it back.
Common classes
Classes used by multiple components are in the seedu.addressbook.commons package.
Implementation
This section describes some noteworthy details on how certain features are implemented.
Autocomplete Feature
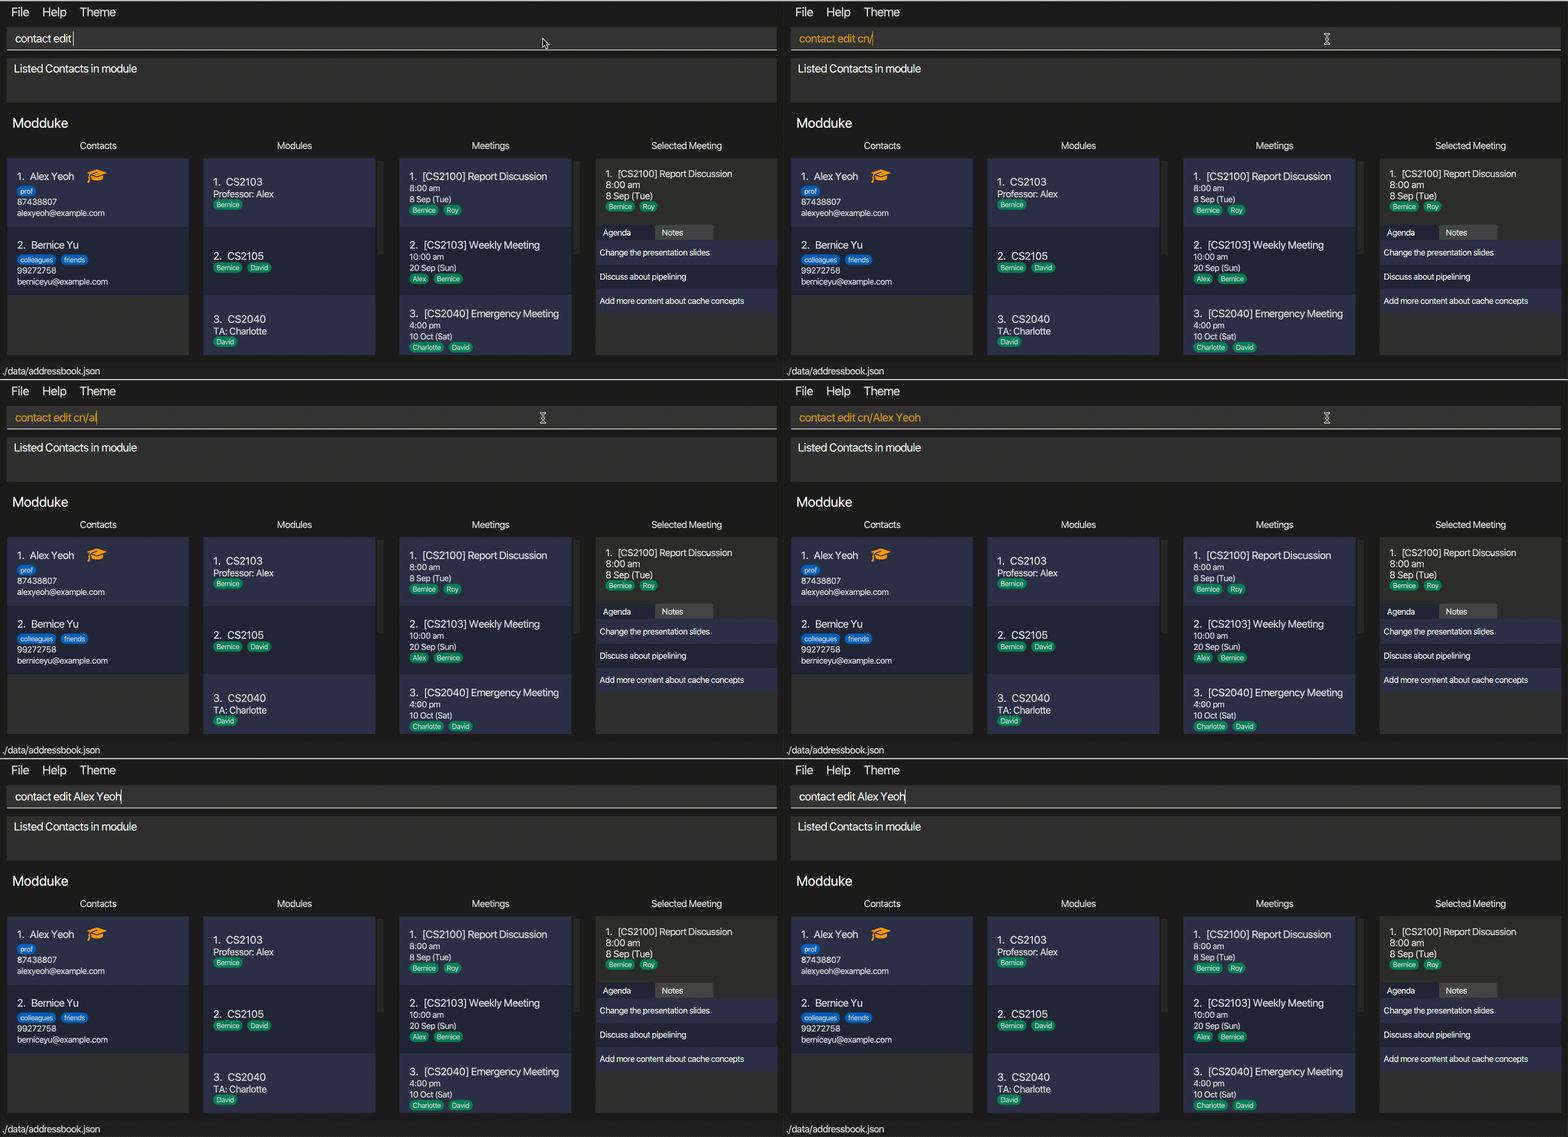
Overview
The following activity diagram gives a high level overview of the Autocomplete logic.
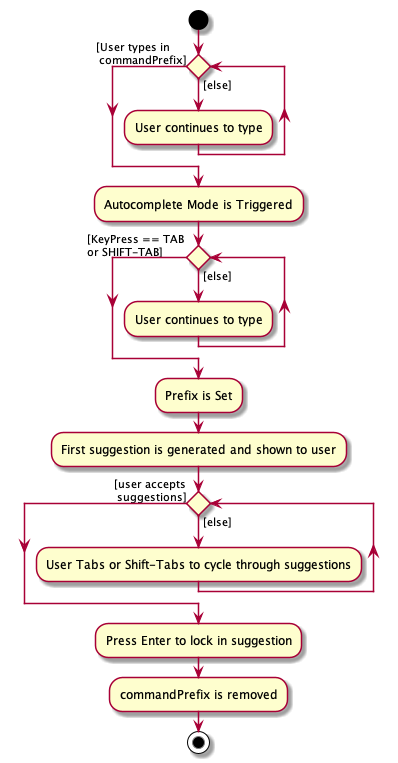
From this diagram we see that there is 2 states of the mechanism:
-
isAutocompleteMode— Which is triggered after user has typed incommandPrefix. -
hasSetPrefix— Set usingTab/Shift-Tabwhile in autocomplete mode.
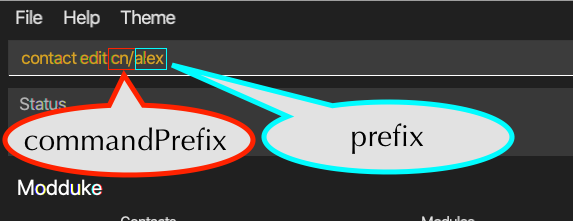
There are also 2 other important terms which are used, first of which is the commandPrefix. This refers to the specific series of characters that when the user inputs into a TextField, will trigger
the autocomplete mode. And secondly, prefix which refers to the string that will be used to generate the suggestions. In the image below, “cn/” is the commandPrefix while
“alex” is the prefix.
Structure of Autocomplete
The autocomplete mechanism is facilitated by AutocompleteModule which can be attached to a JavaFX TextField.
An instance of AutocompleteModule will must be binded to one TextField object which will be enhanced with Autocomplete capabilities.
AutocompleteModule will setup the relevant listeners to its attached TextField object and will internally store and managed the isAutocompleteMode and hasSetPrefix states.
This feature also makes use of the Suggestions class to facilitate suggestion generation based on given prefix. Below is a class diagram representing this structure.
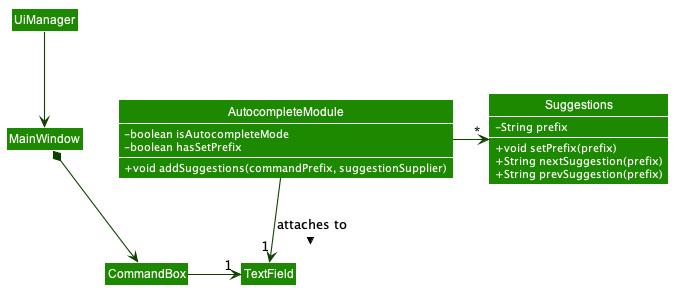
This new feature exposes 2 new public function of AutocompleteModule :
-
attachTo(TextField textField)— This method attaches the givenTextFieldwith the autocomplete module and returns the newAutocompleteModuleobject. -
addSuggestions(String commandPrefix, Suppler<List<Strings>> data)— Attaches a new autocomplete trigger which triggers autocomplete mode withcommandPrefixand generates suggestions fromdatasupplier.
Now we can do a deeper dive into the mechanisms of the feature by examining a sample usuage.
Deep Dive : Autocomplete Mechanism
Given below is an example usage scenario and how the autocomplete mechanism behaves at each step.
Initialization
Sample Initialisation Code Snippet :
// In MainWindow.java
CommandBox commandBox = new CommandBox(cmdExecutor);
TextField commandTextField = commandBox.getCommandTextField()

AutocompleteModule acMod = AutocompleteModule.attachTo(commandTextField);
acMod.addSuggestions("cname/", () -> List.of("Alice", "Bob", "Charlie")).collect(Collectors.toList()));
The above code first initialises a sample CommandBox object from which we extract out it’s TextField object. We then proceed to attach the AutocompleteModule to the TextField object
and add a sample Suggestions object (with commandPrefix “cname/” and generating suggestions from an arbitary list).
Below is a sequence diagram explaining how a AutocompleteModule enhances the TextField object.
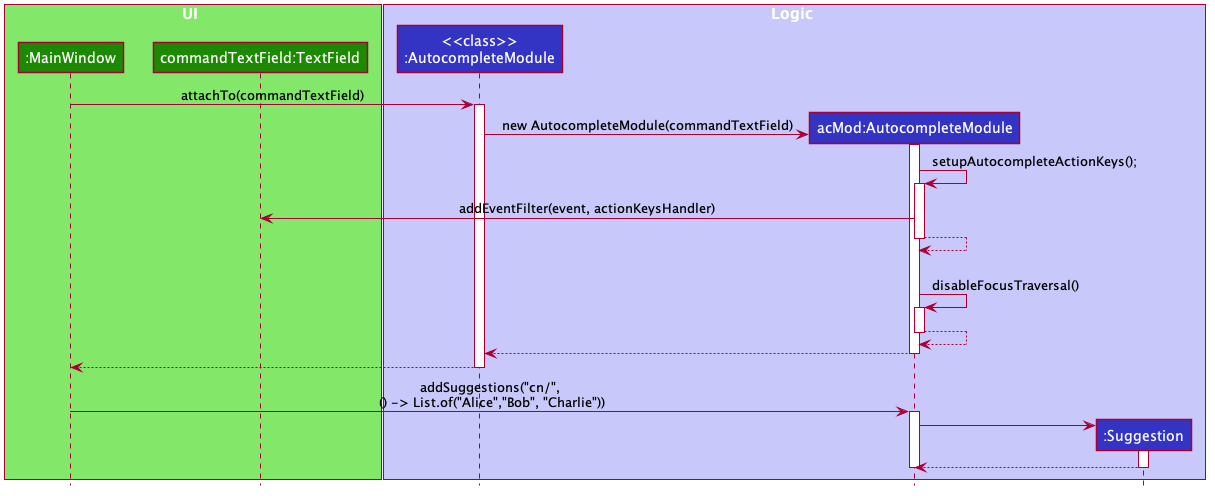
Refer to the Side Note in this section on why disableFocusTraversal() is required.
Triggering Autocomplete Mode
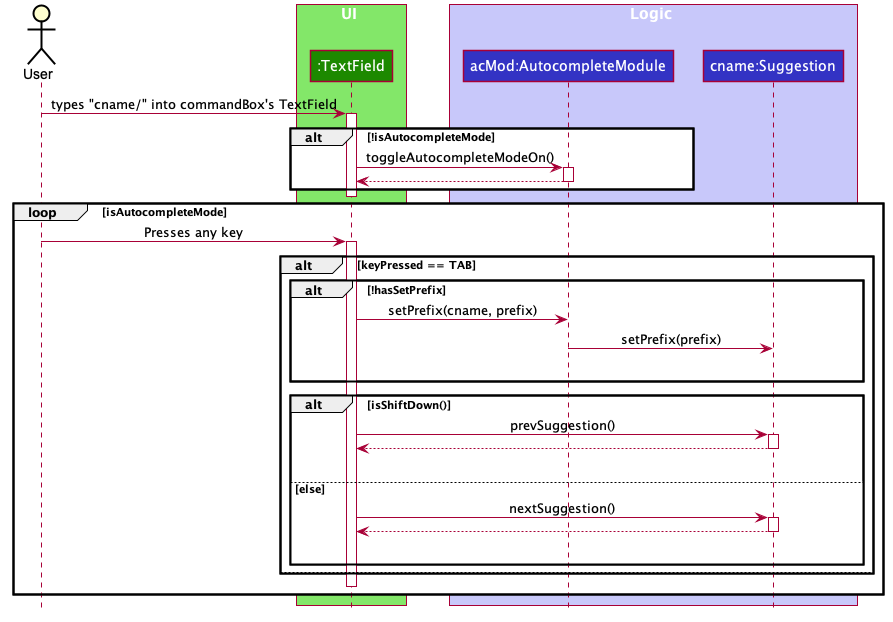
With the autocomplete module has been attached, Autocomplete mode will be triggered when the last few characters in the TextField matches the command prefix. In this case its cname/, and upon typing this prefix
the command box text will turn yellow signalling that the user is in autocomplete mode. In this mode, anything the user types after the command prefix till the point the user presses TAB will be
considered the prefix that will be used to generate suggestions. After TAB pressed, prefix is set and first suggestions is shown. Pressing TAB or Shift-TAB will allow users to cycle through the suggestions forward and backward respectively.
Below is the sequence diagram for this flow.
Exiting Autocomplete Mode
There are two ways to exit autocomplete mode : by pressing Enter or Backspace. Below’s sequence diagram illustrates the difference between the two.
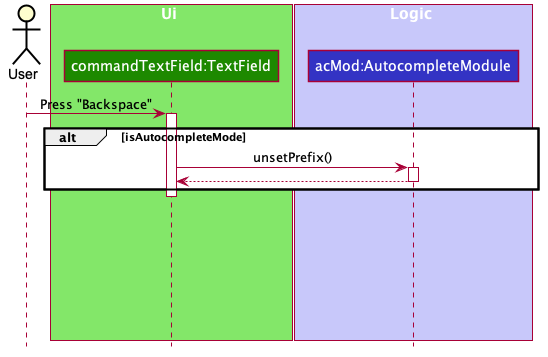
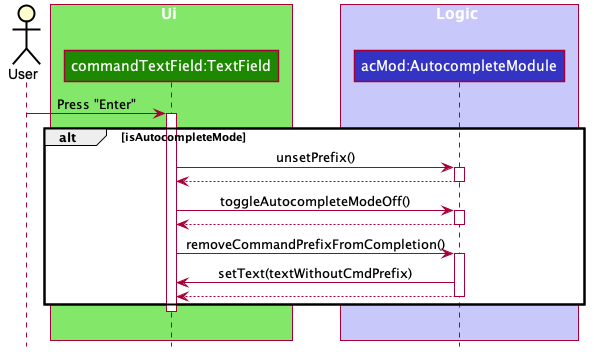
From the diagram, we see that pressing backspace only unsets the prefix but does not take the user out of the autocomplete mode, allowing user to adjust their prefix to generate more accurate suggestions.
On the other hand, pressing Enter allows the user to lock in their suggestion, taking user out of the autocomplete mode and removing the command prefix.
Design consideration:
Aspect: Autocomplete Trigger
-
Alternative 1 (current choice): Check substring from caret position
- Pros: Able to support names with spaces.
- Cons:
- Slightly more difficult to implement, as there are more edge cases.
- User can only enter autocomplete mod at the end of strings and not in the middle.
-
Alternative 2: Using regex to match pattern (e.g.
.*<CMD_PREFIX>\S*)- Pros:
- Less complex code. (Lesser Conditionals)
- Able to support moving caret around to adjust suggestion
- Cons: Unable to support names with spaces as space is the delimiter.
- Pros:
Side Note
Because we iterate through autocompletion suggestions using Tab and Shift-Tab which conflicts with the inbuilt
focus traversals commands. We have to disable it using the AutocompleteCommandBox#DisableFocusTraversal() operation.
Fuzzy Find Completion Feature (Fzf)
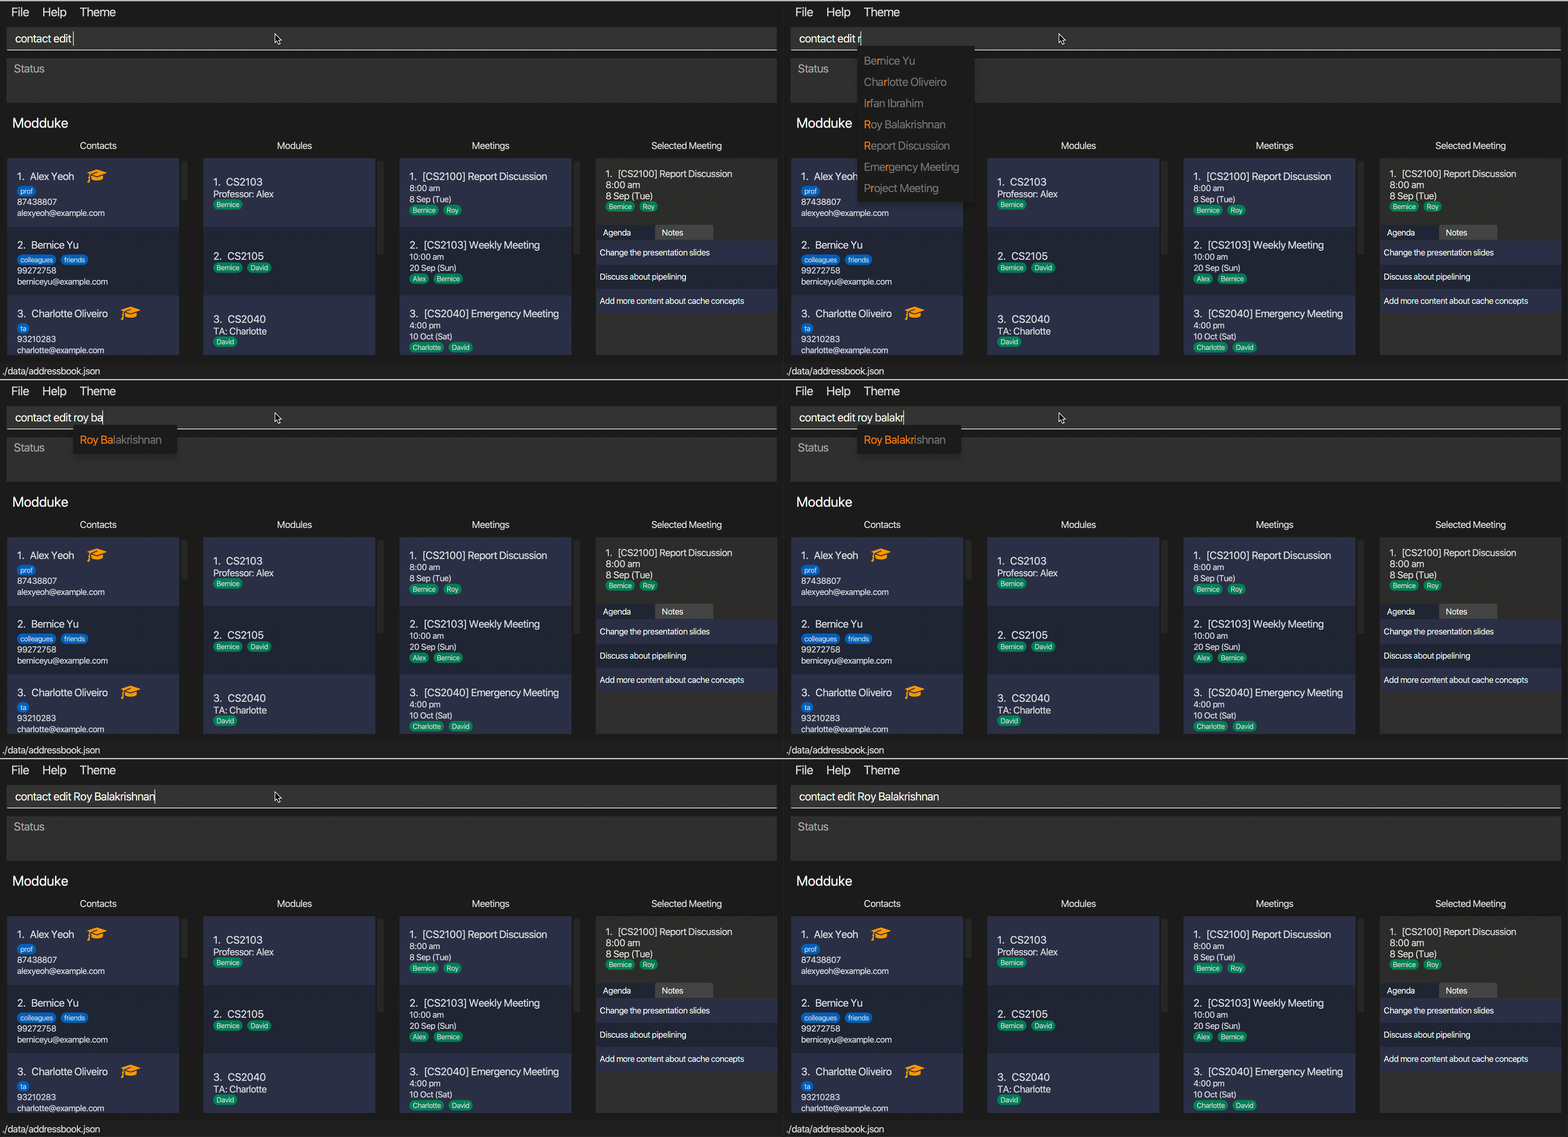
Overview
This feature is actually an improvement from autocomplete which was inspired from reading this article.
Having visual feedback and improving flexibility of the search were the focus of this feature, however despite serving similar purposes
we have decided to split this into two features because we want to position the Autocomplete feature as an entity-specific autocompletion, while our Fuzzy Find feature is a search-everywhere feature.
The Fzf feature is facilitated by the FzfModule class which adopts the TextField module structure
similar to that in the AutocompleteModule class where we have the FzfModule class latching onto a TextField
enhancing it with Fzf capabilities. You can refer to the Autocomplete section to find out more, but to sum it up, upon attaching the module
to a given textfield instance, the module instance will attach the relevant listeners to the textfield and manage the logic and state of the feature.
This new feature exposes 1 new public function of FzfModule :
-
attachTo(TextField textField, Suppler<List<Strings>> data)— This method attaches the givenTextFieldwith the fzf module together with a list supplier from which suggestions will be generated from and returns the newFzfModuleobject.
You can refer to Autocomplete to better understand how text field modules work, this section will focus on the main difference between fzf and autocomplete.
Autocomplete vs Fzf : The query
In this section query refers to the string that the users wishes to autocomplete / generate suggestions from.
Besides the differences in trigger points and exit points, the biggest difference is how the query is being calculated. For the autocomplete
feature, the query is calculated from the caret position of the last character in the commandPrefix to the end of string.

This inevitably has some drawbacks which forces us to disallow autocompletion from the middle of the section. To support a truly dynamic query field,
one would have to track the caret position of the start and end positions of the query, and would have to update the position accordingly to any given keystroke (e.g. Backspace or when user jumps the caret position).
However, thankfully for us JavaFx already supports such a component out of the box : TextField. Below is a sequence diagram showing how
FzfModule updates its query field using the TextField component.
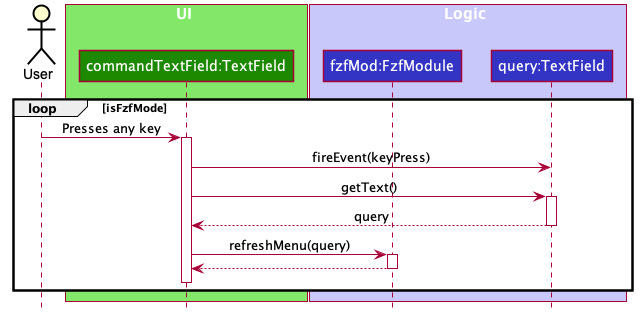
We see here that key strokes are “forwarded” to the query component while in fzf mode which allows query to be properly updated. This allows fzf mode to be triggered anywhere in the text field. However, this design decision may come with some performance overhead.
In the future, we are looking to create a stripped down the TextField component that is able to fulfill this functionality which will allow us to swap out this text field component to reduce any performance overhead.
Clearing all Contacts
The mechanism to clear all contacts is facilitated by ClearCommand. It extends Command and implements the following methods:
-
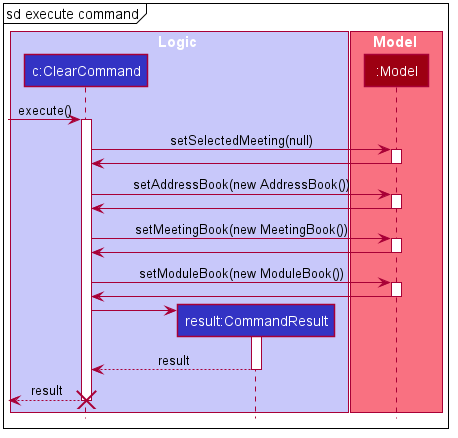
ClearCommand#execute- Clears the Selected Meeting and resets the AddressBook, ModuleBook and MeetingBook to a new empty AddressBook, ModuleBook and MeetingBook respectively.
This operation is exposed in the LogicManager class as LogicManager#execute.
Resetting the AddressBook
Execution Code Snippet :
model.setSelectedMeeting(null);
model.setAddressBook(new AddressBook());
model.setMeetingBook(new MeetingBook());
model.setModuleBook(new ModuleBook());
The above code snippet sets the AddressBook in the model to a new AddressBook object. Thus, resetting the AddressBook.
As modules and meetings cannot exist without contacts, the code also sets the MeetingBook and ModuleBook in the model
to a new MeetingBook and ModuleBook object respectively, which resets both books. As there are no existing meetings,
the SelectedMeeting is set to null.
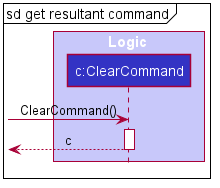
Given below are the sequence diagrams of how the mechanism behaves when called using the contact clear command.
Listing all Contacts
The mechanism to list all contacts is facilitated by ListCommand. It extends Command and implements the following methods:
-
ListCommand#execute- Displays all Persons in the AddressBook.
This operation is exposed in the LogicManager class as LogicManager#execute.
Displaying all Persons in Modduke
Execution Code Snippet :
model.updateFilteredPersonList(PREDICATE_SHOW_ALL_PERSONS);
The above code snippet updates the FilteredList of Persons in the model using the PREDICATE_SHOW_ALL_PERSONS. This fills the FilteredList with all Persons in the AddressBook and displays it.
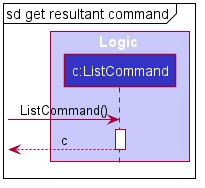
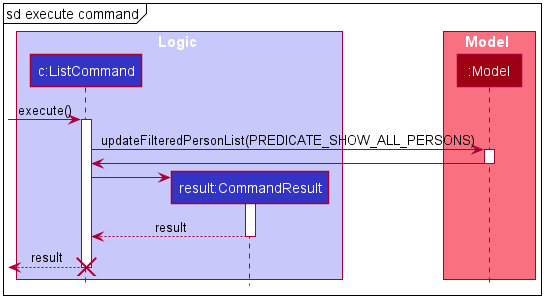
Given below are the sequence diagrams of how the mechanism behaves when called using the contact list command.
Deleting Contacts
The mechanism to delete contacts is facilitated by DeleteCommand. It extends Command and implements the following methods:
-
DeleteCommand#execute- Deletes Persons in the AddressBook according to the user input.
This operation is exposed in the LogicManager class as LogicManager#execute.
Parsing the User Input
The parsing of user input for DeleteCommand is facilitated by DeleteCommandParser. It extends Parser and implements the following methods:
-
DeleteCommandParser#parse- Parses the user input and returns the appropriate DeleteCommand
Checking for Argument Prefixes
Code Snippet :
if (arePrefixesPresent(argMultimap, PREFIX_NAME, PREFIX_TAG, PREFIX_MODULE)) {
    // implementation
} else if (arePrefixesPresent(argMultimap, PREFIX_NAME, PREFIX_TAG)) {
    // implementation
} else if (arePrefixesPresent(argMultimap, PREFIX_NAME, PREFIX_MODULE)) {
    // implementation
} else if (arePrefixesPresent(argMultimap, PREFIX_MODULE, PREFIX_TAG)) {
    // implementation
} else if (arePrefixesPresent(argMultimap, PREFIX_NAME)) {
    // implementation
} else if (arePrefixesPresent(argMultimap, PREFIX_TAG)) {
    // implementation
} else if (arePrefixesPresent(argMultimap, PREFIX_MODULE)) {
    // implementation
} else {
    throw new ParseException(String.format(MESSAGE_INVALID_COMMAND_FORMAT, DeleteCommand.MESSAGE_USAGE));
}
The above code snippet will check the prefixes present in the argument. It starts by checking if all valid prefixes are present,
then a combination of 2 prefixes, then lone prefixes and throws a ParseException if there are no prefixes present.
Choosing a Predicate
In order to find the Persons in the AddressBook who match the given arguments, DeleteCommandParser will pass the appropriate Predicate into
DeleteCommand. These are Predicates available and the code snippets of their test methods:
-
FullNameMatchesKeywordPredicate- Finds Persons whose full names match the given arguments following then/prefixreturn keywords.stream() .anyMatch(keyword -> person.getName().fullName.toLowerCase().equals(keyword.toLowerCase())); -
PersonHasTagsPredicate- Finds Persons who have the tags that match the given arguments following thet/prefixreturn tags.stream() .anyMatch(tag -> person.getTags().contains(tag)); -
PersonHasTagsAndNamePredicate- Finds Persons whose full names match the given arguments following then/prefix or have the tags that match the given arguments following thet/prefixreturn names.stream() .anyMatch(keyword -> person.getName().fullName.toLowerCase().equals(keyword.toLowerCase())) || tags.stream() .anyMatch(tag -> person.getTags().contains(tag));
Checking if Person is in a Module
In order to find Persons who are in the given Modules, a List of ModuleNames is passed into the DeleteCommand by the DeleteCommandParser.
Then the DeleteCommand#execute method calls model#GetUpdatedFilteredPersonList with its predicate and the List to retrieve Persons in the give Modules.
Retrieving Modules Code Snippet :
List<Module> moduleList = new ArrayList<>();
for (ModuleName name : modules) {
    Module m = moduleBook.getModule(name)
            .orElseThrow(() -> new CommandException(
                    String.format("Module %s does not exist.", name.toString())));
    moduleList.add(m);
}
The above code snippet is from ModelManager#GetUpdatedFilteredPersonList and will look through the moduleBook for the given Module. If the Module exists, it adds it to the List module.
Combining Predicates Code Snippet :
Predicate<Person> combined = x -> predicate.test(x)
        || moduleList.stream()
        .anyMatch(m -> m.getClassmates().contains(x));
return new FilteredList(filteredPersons, combined);
The above code snippet is from ModelManager#GetUpdatedFilteredPersonList and it creates a new Predicate that checks if a Person passes
the predicate passed into the method or is in any of the Modules in the List module. Then it uses this Predicate to obtain a FilteredList
of Persons that satisfy the Predicate.
No given Modules
If there are no given Modules, then the DeleteCommand#execute method calls model#GetUpdatedFilteredPersonList with its predicate only.
Obtaining FilteredList Code Snippet :
return new FilteredList(filteredPersons, predicate);
The above code snippet is from ModelManager#GetUpdatedFilteredPersonList and it will simply use the given predicate to
obtain a FilteredList of Persons that satisfy the Predicate.
Deleting the Filtered Persons
Once the DeleteCommand has retrieved the FilteredList of Persons, it will delete all Persons in that FilteredList from Modduke.
Deleting Persons Code Snippet :
people.stream().forEach(p -> {
    model.deletePerson(p); // delete in AddressBook
    model.updatePersonInMeetingBook(p); // delete in MeetingBook
    model.updatePersonInModuleBook(p); // delete in ModuleBook
});
The above code snippet will iterate through all Persons in the FilteredList and delete them from the AddressBook, MeetingBook and ModuleBook.
If any Meeting or Module does not have any more members as a result of this deletion, then they will be deleted as well.
If a Module is deleted, all Meetings of that Module are also deleted.
Activity Diagram
Given below is the activity diagram of how the mechanism behaves when called using the contact delete command.

Copying Email Address/Phone Number of Contacts
The mechanism to copy information from contacts is facilitated by CopyCommand. It extends Command and implements the following methods:
-
CopyCommand#execute- Copy email addresses or phone numbers of Persons in the AddressBook according to the user input.
This operation is exposed in the LogicManager class as LogicManager#execute.
Parsing the User Input
The parsing of user input for CopyCommand is facilitated by CopyCommandParser. It extends Parser and implements the following methods:
-
CopyCommandParser#parse- Parses the user input and returns the appropriate CopyCommand
The mechanism used to parse user input is very similar to that of DeleteCommandParser, except that CopyCommandParser
also identifies the preamble in the arguments.
Identifying the Preamble
Identifying Preamble Code Snippet :
boolean isEmail;
String preamble = argMultimap.getPreamble().trim().toLowerCase();
if (preamble.equals("email")) {
    isEmail = true;
} else if (preamble.equals("phone")) {
    isEmail = false;
} else {
    throw new ParseException(String.format(MESSAGE_INVALID_COMMAND_FORMAT, CopyCommand.MESSAGE_USAGE));
}
The above code snippet will check the preamble in the argument. It assigns the boolean isEmail to true if the user
wants to copy email addresses, false if the user wants to copy phone numbers and throws a ParseException otherwise.
Retrieving the Filtered Persons
The mechanism used by CopyCommand to obtain the FilteredList of Persons is identical to that of DeleteCommand.
Copying Information from the Filtered Persons
Once the CopyCommand has retrieved the FilteredList of Persons, it will copy information from all Persons in that FilteredList from Modduke.
Obtaining Information from Persons Code Snippet :
if (isEmail) {
    // gets email addresses from Persons in people
    results = people.stream()
            .map(p -> p.getEmail().toString())
            .reduce("", (x, y) -> x + " " + y);
} else {
    // gets phone numbers from Persons in people
    results = people.stream()
            .map(p -> p.getPhone().toString())
            .reduce("", (x, y) -> x + " " + y);
}
The above code snippet will check if the user wants to copy email adresses or phone numbers using the isEmail boolean.
Then it iterates through the FilteredList of Persons and obtains the relavant information as Strings. Then it combines
the Strings into a single String.
Copying Information to Clipboard Code Snippet :
StringSelection selection = new StringSelection(results);
Clipboard clipboard = Toolkit.getDefaultToolkit().getSystemClipboard();
clipboard.setContents(selection, selection);
The above code snippet will then create a new StringSelection object using the single String of information and copy
the StringSelection into the user’s system clipboard.
Activity Diagram
Given below is the activity diagram of how the mechanism behaves when called using the copy command.

Finding Contacts
The mechanism to find contacts is facilitated by FindCommand. It extends Command and implements the following methods:
-
FindCommand#execute- Display Persons in the AddressBook according to the user input.
This operation is exposed in the LogicManager class as LogicManager#execute.
Parsing the User Input
The parsing of user input for FindCommand is facilitated by FindCommandParser. It extends Parser and implements the following methods:
-
FindCommandParser#parse- Parses the user input and returns the appropriate FindCommand
The mechanism used to parse user input is very similar to that of DeleteCommandParser, except that FindCommandParser
does not look for the m/ prefix when parsing the arguments. So it does not pass a List of Modules into the FindCommand.
It also uses the NameContainsKeywordPredicate and PersonHasTagsAndKeywordInNamePredicate instead.
Displaying the Filtered Persons
In order to display the Filtered Persons, the FindCommand calls model#updateFilteredPersonList with its predicate.
Update Filtered Person List Code Snippet :
filteredPersons.setPredicate(predicate);
The above code snippet is from ModelManager#updateFilteredPersonList and it sets predicate of the filteredPersons of the model
to the given predicate. Doing so will display the Persons who satisfy the conditions specified in the user input.
Activity Diagram
Given below is the activity diagram of how the mechanism behaves when called using the contact find command.

Tagging Contacts
The mechanism to tag contacts is facilitated by AddTagCommand, ClearTagCommand and DeleteTagCommand. They
extends Command and implement the following methods:
-
AddTagCommand#execute- Adds the specified tags to the specified Person in the AddressBook according to the user input. -
ClearTagCommand#execute- Clears all tags of the specified Person in the AddressBook in the user input. -
DeleteTagCommand#execute- Deletes the specified tags from the specified Person in the AddressBook according to the user input. These operations are exposed in theLogicManagerclass asLogicManager#execute.
Parsing User Input
The parsing of user input for AddTagCommand, ClearTagCommand and DeleteTagCommand is facilitated by
AddTagCommandParser, ClearTagCommandParser and DeleteTagCommandParser respectively. They extend Parser
and implement the following methods:
-
AddTagCommandParser#parse- Parses the user input and returns the appropriate AddTagCommand -
ClearTagCommandParser#parse- Parses the user input and returns the appropriate ClearTagCommand -
DeleteTagCommandParser#parse- Parses the user input and returns the appropriate DeleteTagCommand
All three parsers are identical except that they return their respective commands and AddTagCommandParser and DeleteTagCommandParser
parses for the t/ prefix in the arguments.
Obtaining a Name Object
All three parsers call ParserUtil#parseName to obtain a Name object based on the given name in the user input.
AddTagCommandParser and DeleteTagCommandParser pass in the preamble of the argument into ParserUtil#parseName,
while ClearTagCommandParser passes in the entire argument.
Parse Name Code Snippet :
String trimmedName = name.trim();
if (!Name.isValidName(trimmedName)) {
    throw new ParseException(Name.MESSAGE_CONSTRAINTS);
}
return new Name(trimmedName);
The above code snippet if from ParserUtil#parseName and it will check if the given name is in a valid format. If it is
it creates and returns a new Name object with the given name. Otherwise, it throws a ParseException. This Name object
is passed into the respective command object that will be returned by each parser.
Obtaining a List of Tags
This is only applicable to AddTagCommandParser and DeleteTagCommandParser. Both parsers obtain a List of
Strings that follow the t/ prefix from the argument. Then it obtains a Set of Tags Strings.
Obtaining Set of Tag Strings Code Snippet:
if (tags.size() == 1 && tags.contains("")) {
    return Optional.empty();
}
Collection<String> tagSet = tags;
return Optional.of(ParserUtil.parseTags(tagSet));
The above code snippet checks for an empty String in the List of Strings. If it has an empty String, then it returns
an empty Optional object. Otherwise, it returns an Optional of the Set with the Strings in the given List.
Then both parsers check if the Optional object is empty. If it is, a ParseException is thrown. Otherwise, AddTagCommandParser
passes the Set of Strings inside the Optional into a TagPersonDescriptor which is passed into the AddTagCommand
while DeleteTagCommandParser passes the Set of Strings into the DeleteCommand. These commands are the commands
that will be returned by each parser respectively.
Modifying the Specified Person
AddTagCommand, ClearTagCommand and DeleteTagCommand will first check if there is a Person with the Name object
given by their parsers using model#hasPersonName. If there does not exist a Person, then a CommandException is thrown.
Otherwise, the Person with the name is obtained from the AddressBook. This Person is then modified by each command accordingly.
-
AddTagCommand- Adds tags to the Person based on theTagPersonDescriptorgiven byAddTagCommandParser
Adding Tags Code Snippet :
Set<Tag> updatedTags = new HashSet<>(personToTag.getTags());

if (tagPersonDescriptor.getTags().isPresent()) {
    updatedTags.addAll(tagPersonDescriptor.getTags().get());
}

return new Person(personToTag.getName(), personToTag.getPhone(), personToTag.getEmail(), updatedTags);
-
ClearTagCommand- Clears all tags of the Personreturn new Person(personToClear.getName(), personToClear.getPhone(), personToClear.getEmail(), new HashSet<>()); -
DeleteTagCommand- Deletes all tags from the Person based on the Set of Strings given byDeleteTagCommandParser. Throws aCommandExceptionif the Person does not have a specifed tag.if (tags.stream().allMatch(tag -> personToEdit.getTags().contains(tag))) { Set<Tag> updatedTags = new HashSet<>(personToEdit.getTags()); updatedTags.removeAll(tags); return new Person(personToEdit.getName(), personToEdit.getPhone(), personToEdit.getEmail(), updatedTags); } else { throw new CommandException( String.format("The person '%s' does not have all the tags provided.", personToEdit.getName().toString())); }
Updating Modduke
Once they have obtained the modified Person, they replace the original Person with the modified one in the AddressBook,
MeetingBook and ModuleBook.
Updating Modduke Code Snippet :
model.setPerson(personToTag, taggedPerson);

model.updatePersonInMeetingBook(personToTag, taggedPerson);

model.updatePersonInModuleBook(personToTag, taggedPerson);
The above code snippet updates the Person in each of the three books.
Sequence Diagram
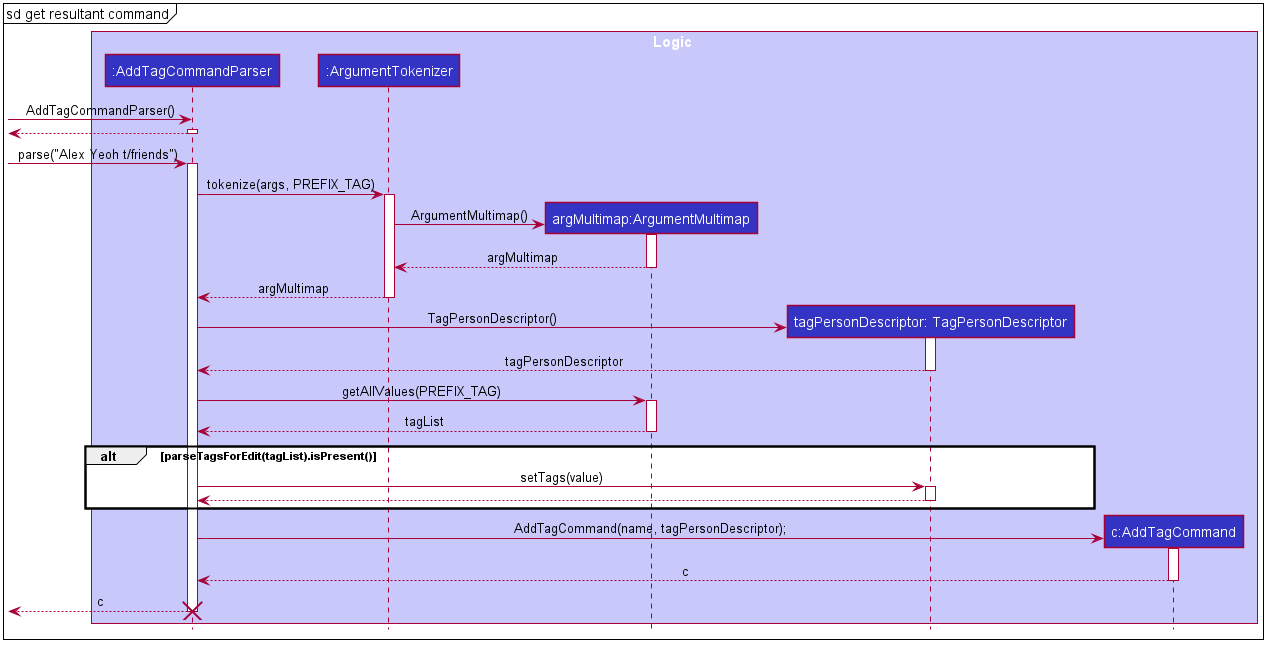
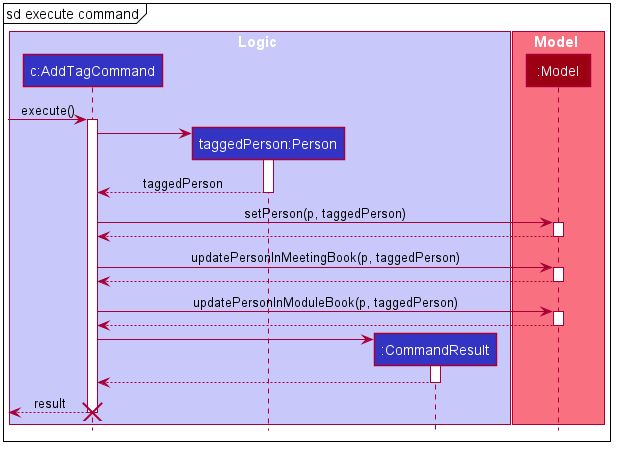
Given below are the sequence diagrams of how the mechanism behaves when called using the tag add command.
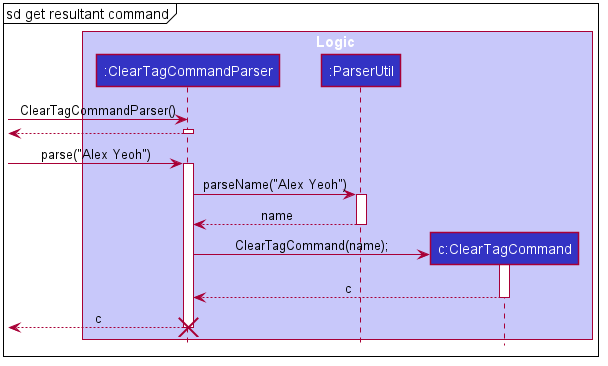
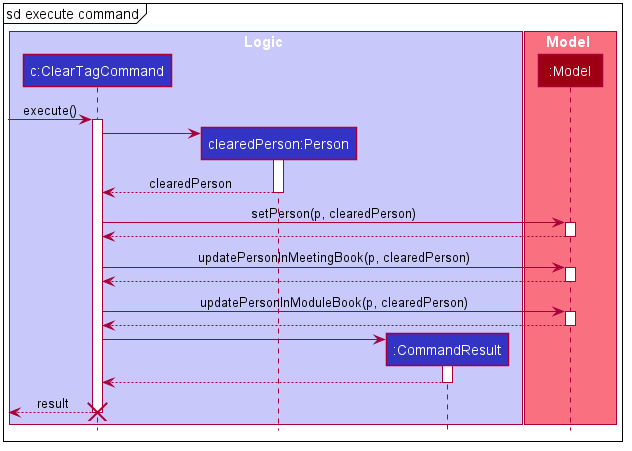
Given below are the sequence diagrams of how the mechanism behaves when called using the tag clear command.
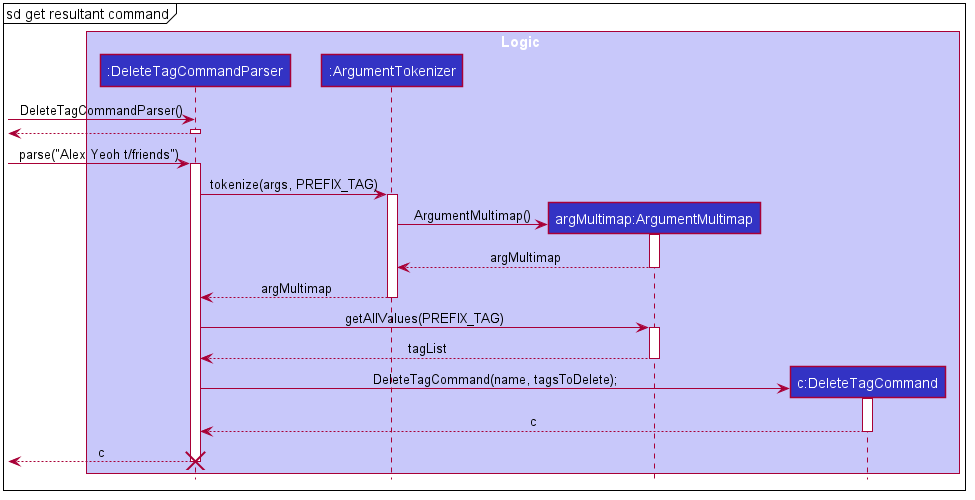
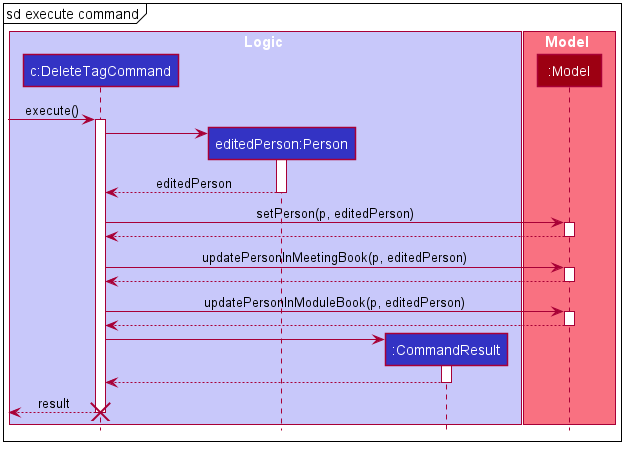
Given below are the sequence diagrams of how the mechanism behaves when called using the tag delete command.
Adding a Module
Implementation
The add module mechanism is primarily facilitated by AddModuleCommand. It extends Command and implements the execute operation:
-
execute(Model model)— Executes theAddModuleCommandon the model, creating and adding a new meeting in theModel Managerbefore creating aCommandResult, triggering a UI update inModuleListPanel
This operation is exposed in the Command class as Command#execute
Parsing the user input
The parsing of the user input for AddModuleCommand is facilitated by AddModuleCommandParser.
AddModuleCommandParser extends Parser and implements the following methods:
- AddModuleCommandParser#parse — Parses the user input and returns the appropriate
AddModuleCommand
AddModuleCommandParser checks that all compulsory fields are provided in the user input and throws a ParseException if the user does not conform to the expected format.
The user input is the parsed in the context of the AddModuleCommand.
Executing the user input
Check if model contains given module
AddModuleCommand checks if the model contains the given module. If so, a CommandException is thrown, indicating that the module already exists within the model.
Check if model contains all participants
AddModuleCommand checks if the model also contains all the given participants. If not, a Command exception is thrown,
indicating that the one or more of the participants given do not exist within the model.
Activity Diagram
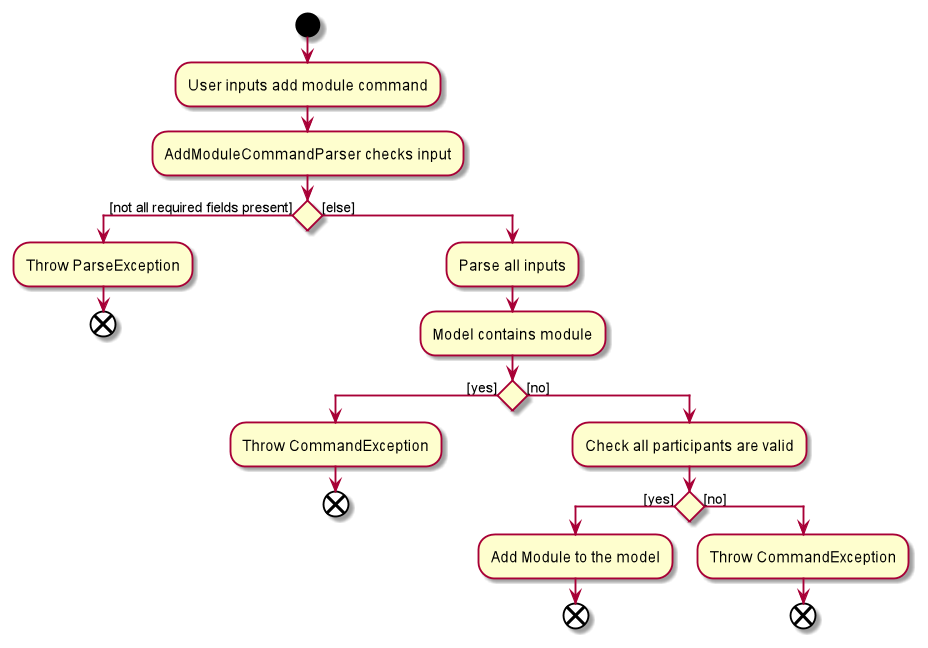
Given below is the activity diagram of how the logic component behaves when called using the module add command.
Editing a Module
Implementation
The edit module mechanism is primarily facilitated by EditModuleCommand. It extends Command and implements the execute operation:
-
execute(Model model)— Executes theEditModuleCommandon the model, creating and adding a new meeting in theModel Managerbefore creating aCommandResult, triggering a UI update inModuleListPanel
This operation is exposed in the Command class as Command#execute
Parsing the user input
The parsing of the user input for EditModuleCommand is facilitated by EditModuleCommandParser.
EditModuleCommandParser extends Parser and implements the following methods:
- EditModuleCommandParser#parse — Parses the user input and returns the appropriate
EditModuleCommand
EditModuleCommandParser checks that all compulsory fields are provided in the user input and throws a ParseException if the user does not conform to the expected format.
The user input is the parsed in the context of the EditModuleCommand.
Executing the user input
Check if model contains given module
EditModuleCommand checks if the model contains the given module. If not, a CommandException is thrown, indicating that the module does not exist in the model.
If the name of the module is changed, check if the new name already exists within the model
The EditModuleCommand checks if the new name of the module already exists within the model to prevent duplicating modules.
If it does, a CommandException is thrown indicating a duplicate module already exists within the model.
If the participants of the module are changed, Check if the new participants exist in the model
The EditModuleCommand checks if the new participants exist within the model. If not, a CommandException is thrown,
indicating that one or more of the participants do not exist within the model.
Check if edited module is the same as original module
The EditModuleCommand checks if the edited module is the same as the original module. If so, a CommandException is thrown,
indicating that the module is the same as the orignal module.
Check if the modules relevant meetings have no participants
The EditModuleCommand checks if the edited modules relevant meetings have no participants. For meetings with at least one of the new participants,
the participants are updated. For meetings with no participants, they are deleted.
Activity Diagram
Given below is the activity diagram of how the logic component behaves when called using the module edit command.
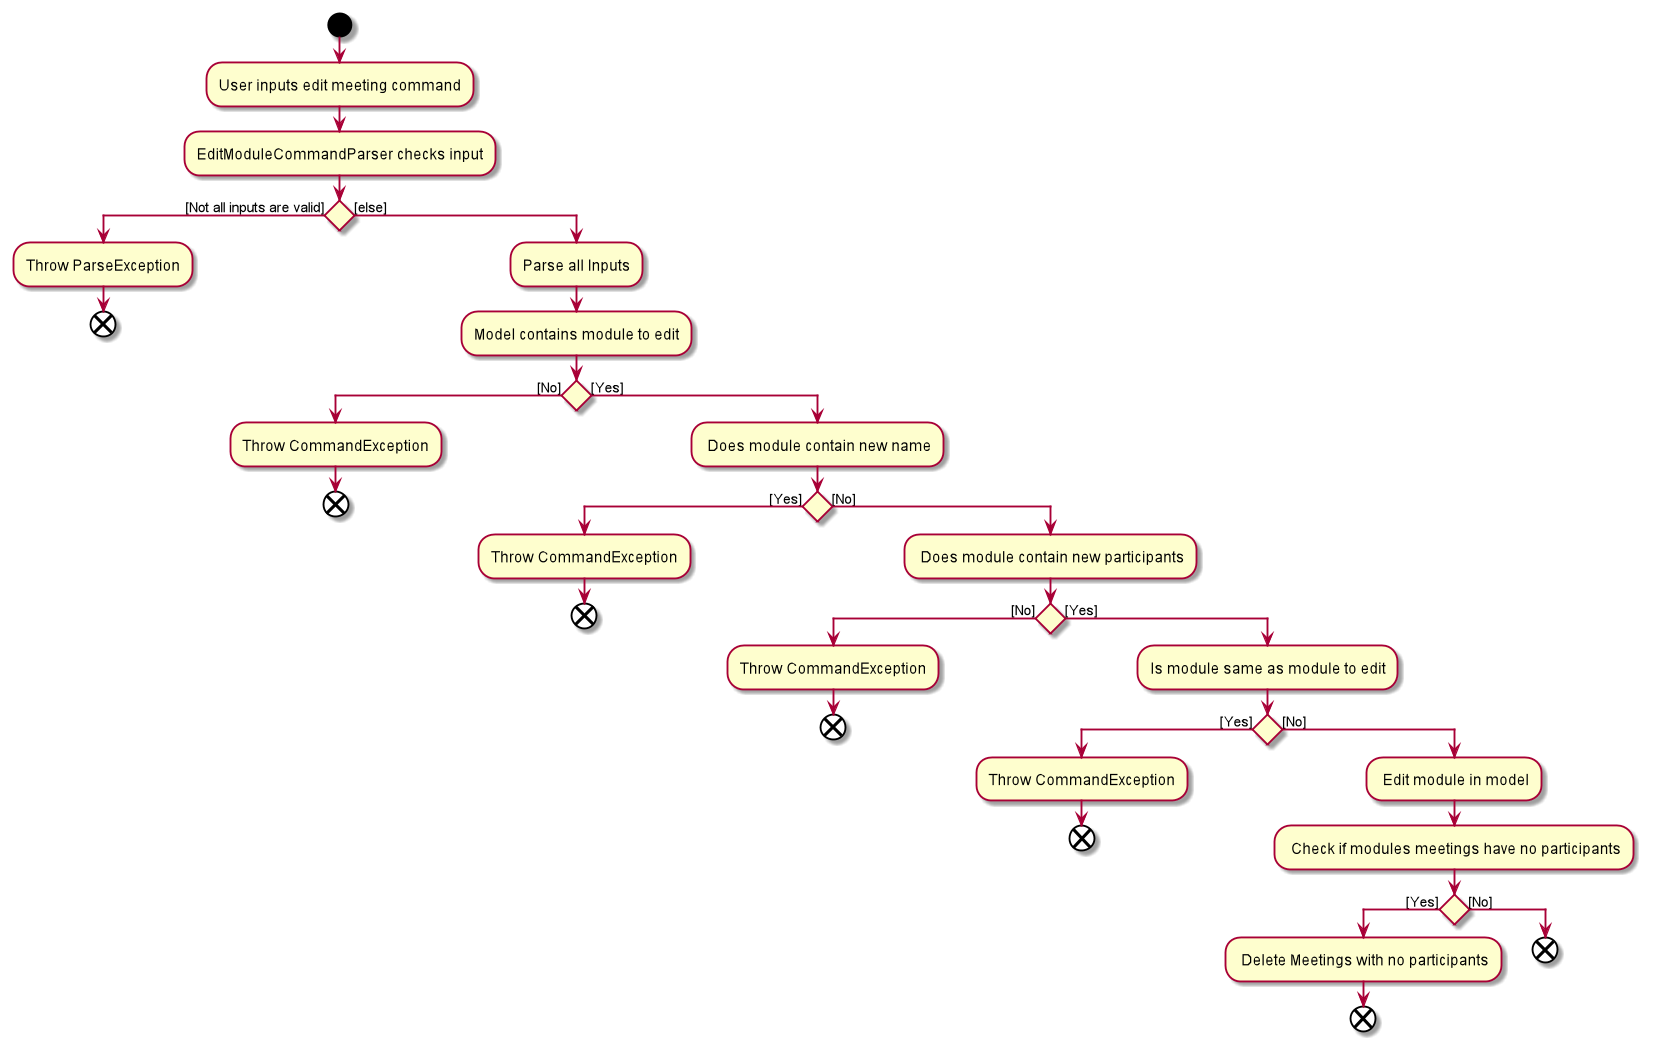
###Deleting a Module
Implementation
The delete module mechanism is primarily facilitated by DeleteModuleCommand. It extends Command and implements the execute operation:
-
execute(Model model)— Executes theDeleteModuleCommandon the model, creating and adding a new meeting in theModel Managerbefore creating aCommandResult, triggering a UI update inModuleListPanel. It also deletes the meetings of the provided module and triggers a UI update in theMeetingListPanel
This operation is exposed in the Command class as Command#execute
Parsing the user input
The parsing of the user input for DeleteModuleCommand is facilitated by DeleteModuleCommandParser.
DeleteModuleCommandParser extends Parser and implements the following methods:
- DeleteModuleCommandParser#parse — Parses the user input and returns the appropriate
DeleteModuleCommand
DeleteModuleCommandParser checks that all compulsory fields are provided in the user input and throws a ParseException if the user does not conform to the expected format.
The user input is the parsed in the context of the DeleteModuleCommand.
Executing the user input
Check if model contains given module
DeleteModuleCommand checks if the model contains the given module. If not, a CommandException is thrown, indicating that the module does not exist in the model.
Deleting all meetings of the module
DeleteModuleCommand iterates through all the meetings of the module and deletes them along with the module.
Activity Diagram
Given below is the activity diagram of how the logic component behaves when called using the module delete command.
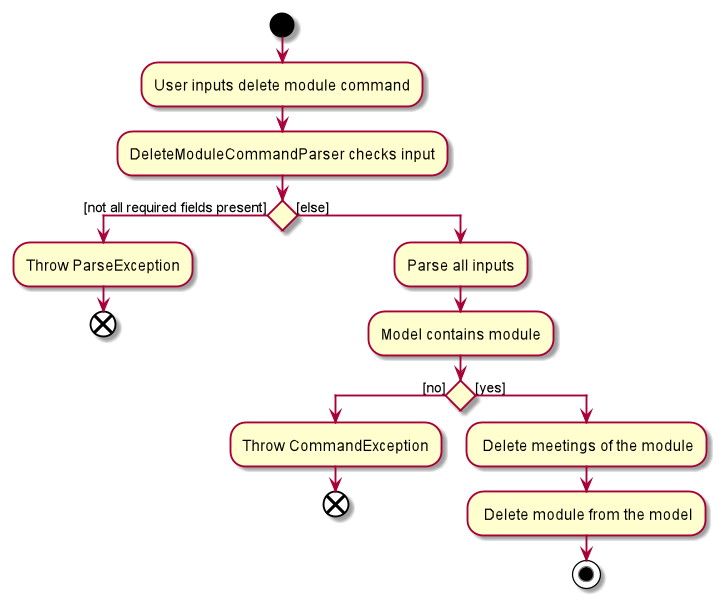
Listing Contacts in a Module
The module list mechanism is primarily facilitated by the ListModuleCommand. It extends Command and implements the execute operation:
-
execute(Model model)— Executes theListModuleCommandon the model, creating and adding a new meeting in theModel Managerbefore creating aCommandResult, triggering a UI update inContactListPanel
This operation is exposed in the Command class as Command#execute
####Parsing the user input
The parsing of the user input for ListModuleCommand is facilitated by ListModuleCommandParser.
ListModuleCommandParser extends Parser and implements the following methods:
- ListModuleCommandParser#parse — Parses the user input and returns the appropriate
ListModuleCommand
ListModuleCommandParser checks that all compulsory fields are provided in the user input and throws a ParseException if the user does not conform to the expected format.
The user input is the parsed in the context of the ListModuleCommand.
Executing the user input
Check if model contains given module
ListModuleCommand checks if the model contains the given module. If not, a CommandException is thrown.
Activity Diagram
Given below is the activity diagram of how the logic component behaves when called using the module list command.
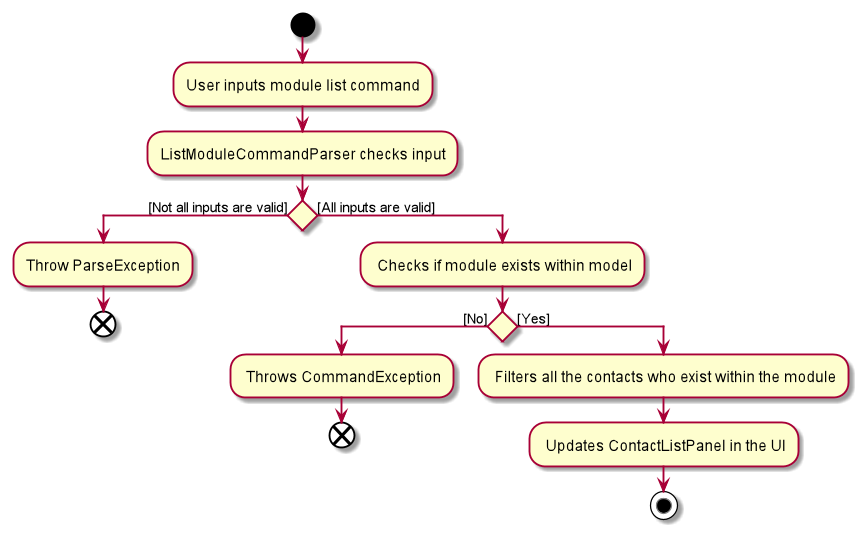
Adding a Meeting
Implementation
The add meeting mechanism is primarily facilitated by AddMeetingCommand. It extends Command and implements the execute operation:
-
execute(Model model)— Executes theAddMeetingCommandon the model, creating and adding a new meeting in theModel Managerbefore creating aCommandResult, triggering a UI update inMeetingListPanel
This operation is exposed in the Command class as Command#execute
Parsing the user input
The parsing of the user input for AddMeetingCommand is facilitated by AddMeetingCommandParser.
AddMeetingCommandParser extends Parser and implements the following methods:
- AddMeetingCommandParser#parse — Parses the user input and returns the appropriate
AddMeetingCommand
AddMeetingCommandParser checks that all compulsory fields are provided in the user input and throws a ParseException if the user does not conform to the expected format.
The user input is the parsed in the context of the AddMeetingCommand.
Executing the user input
Check if model contains given module
AddMeetingCommand checks if the model contains the given module. If not, a CommandException is thrown, indicating that the module does not exist in the model.
Check if model contains given meeting
AddMeetingCommand checks if the model contains the given meeting, identified by the unique combination of module and meeting name.
Meetings are identified by their modules and names for deletion, editing and viewing.
If the given meeting already exists in the model, a CommandException is thrown, indicating that the user is trying to add a duplicate meeting.
Check if model contains another meeting at same date and time
AddMeetingCommand checks if the model contains another meeting at the same time and date as the given meeting.
We assume that a user is unable to attend two meetings simultaneously at the same time and date.
If there is another meeting with conflicting time and date, a CommandException is thrown.
Check if given module contains given participants
AddMeetingCommand checks if the given participants are members of the given module.
We assume that all meetings occur between members of the same module.
If any one of the given participants are not members of the given module, a CommandException is thrown.
Activity Diagram
Given below is the activity diagram of how the logic component behaves when called using the meeting add command.
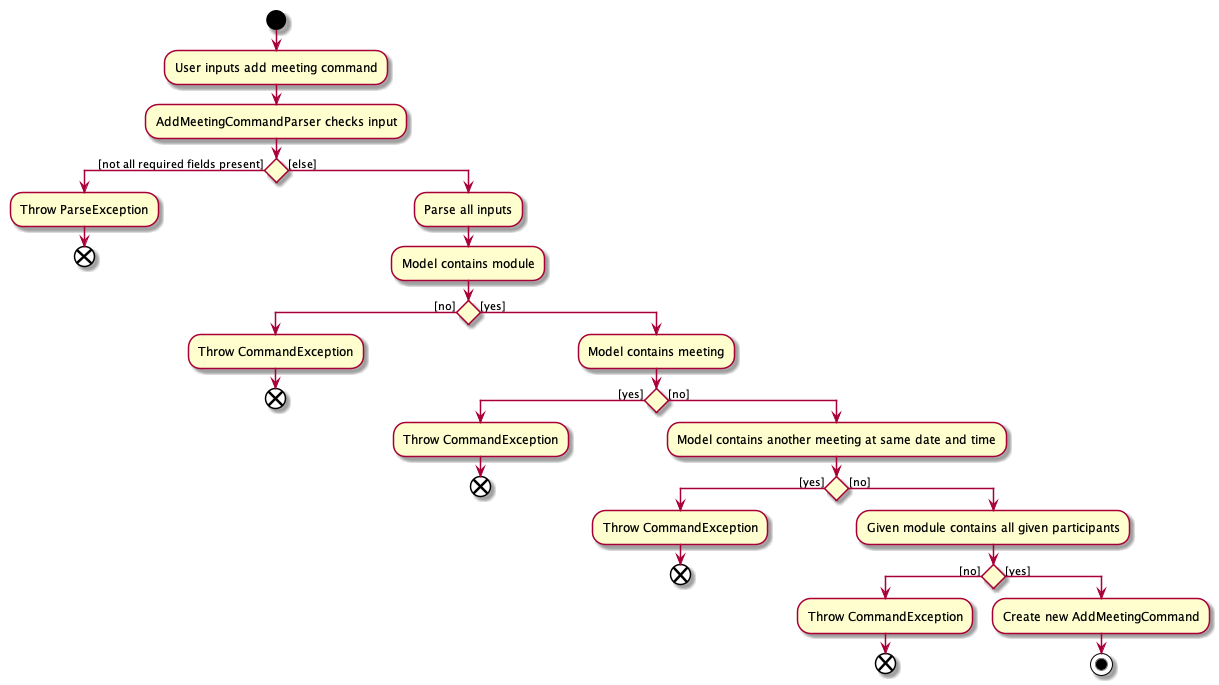
Deleting a Meeting
Implementation
The delete meeting mechanism is primarily facilitated by DeleteMeetingCommand. It extends Command and implements the execute operation:
-
execute(Model model)— Executes theDeleteMeetingCommandon the model, creating and adding a new meeting in theModel Managerbefore creating aCommandResult, triggering a UI update inMeetingListPanel
This operation is exposed in the Command class as Command#execute
Parsing the user input
The parsing of the user input for DeleteMeetingCommand is facilitated by DeleteMeetingCommandParser.
DeleteMeetingCommandParser extends Parser and implements the following methods:
- DeleteMeetingCommandParser#parse — Parses the user input and returns the appropriate
DeleteMeetingCommand
DeleteMeetingCommandParser checks that all compulsory fields are provided in the user input and throws a ParseException if the user does not conform to the expected format.
The user input is the parsed in the context of the DeleteMeetingCommand.
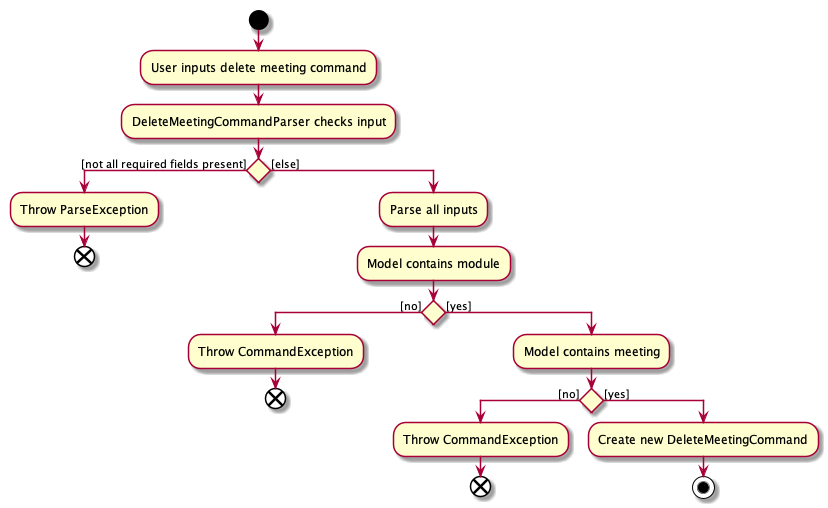
Executing the user input
Check if model contains given module
DeleteMeetingCommand checks if the model contains the given module. If not, a CommandException is thrown, indicating that the module does not exist in the model.
Check if model contains given meeting
DeleteMeetingCommand checks if the model contains the given meeting, identified by the unique combination of module and meeting name.
If the given meeting does not exist in the model, a CommandException is thrown, indicating that the user is trying delete a non existent meeting.
Activity Diagram
Given below is the activity diagram of how the logic component behaves when called using the meeting delete command.
Editing a Meeting
Implementation
The edit meeting mechanism is primarily facilitated by EditMeetingCommand. It extends Command and implements the execute operation:
-
execute(Model model)— Executes theEditMeetingCommandon the model, creating and adding a new meeting in theModel Managerbefore creating aCommandResult, triggering a UI update inMeetingListPanel
This operation is exposed in the Command class as Command#execute
Parsing the user input
The parsing of the user input for EditMeetingCommand is facilitated by EditMeetingCommandParser.
EditMeetingCommandParser extends Parser and implements the following methods:
- EditMeetingCommandParser#parse — Parses the user input and returns the appropriate
EditMeetingCommand
EditMeetingCommandParser checks that all compulsory fields are provided in the user input and throws a ParseException if the user does not conform to the expected format.
The user input is the parsed in the context of the EditMeetingCommand.
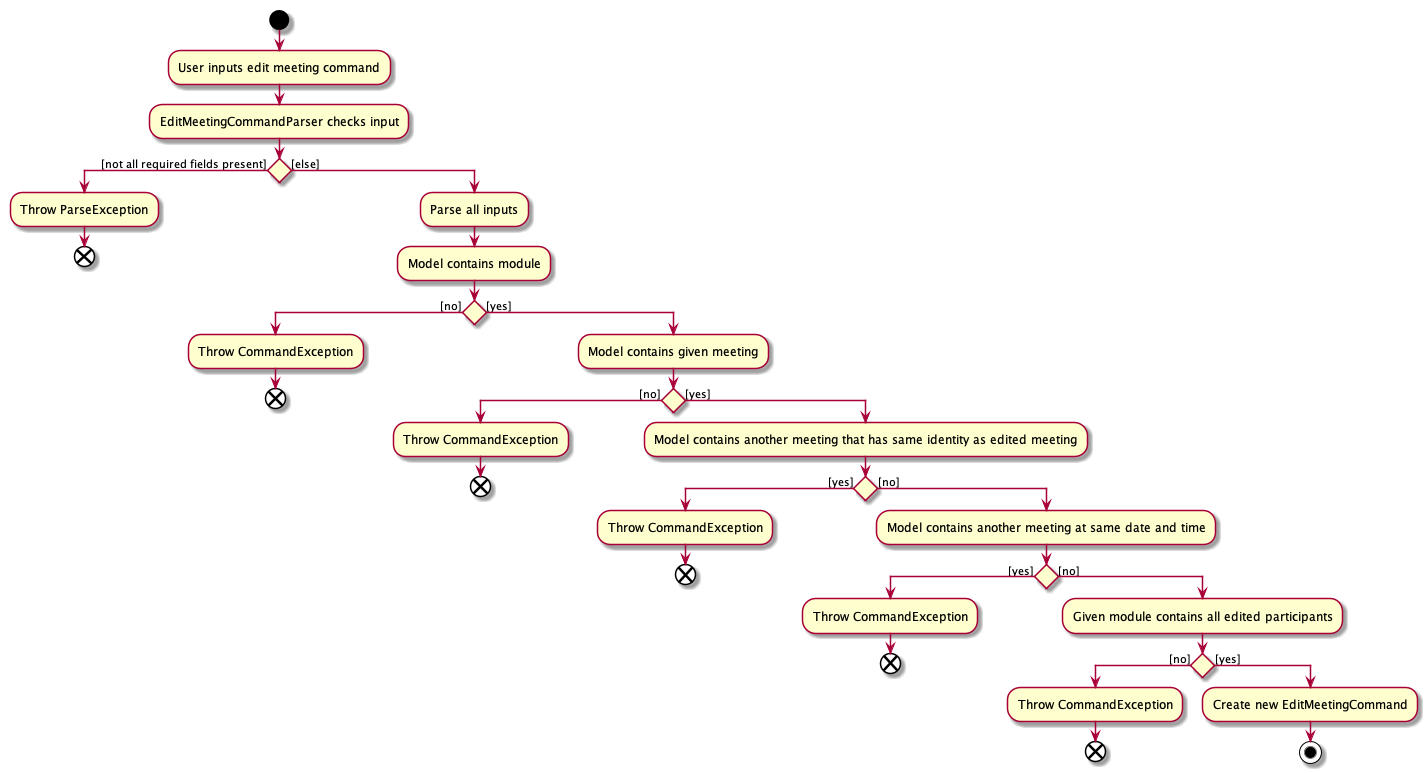
Executing the user input
Check if model contains given module
EditMeetingCommand checks if the model contains the given module. If not, a CommandException is thrown, indicating that the module does not exist in the model.
Check if model contains given meeting
EditMeetingCommand checks if the model contains the given meeting, identified by the unique combination of module and meeting name.
If the given meeting does not exist in the model, a CommandException is thrown, indicating that the user is trying to edit a non existent meeting.
Check if model contains edited meeting
EditMeetingCommand checks if the model contains the edited meeting, identified by the unique combination of module and meeting name.
If the edited meeting exists in the model, a CommandException is thrown, indicating that the user is trying to edit the meeting into a meeting that already exists.
Check if model contains another meeting at same date and time
EditMeetingCommand checks if the model contains another meeting at the same time and date as the edited meeting.
We assume that a user is unable to attend two meetings simultaneously at the same time and date.
If there is another meeting with conflicting time and date, a CommandException is thrown.
Check if given module contains given participants
EditMeetingCommand checks if the edited participants are members of the given module.
We assume that all meetings occur between members of the same module.
If any one of the edited participants are not members of the given module, a CommandException is thrown.
Activity Diagram
Given below is the activity diagram of how the logic component behaves when called using the meeting edit command.
EditMeetingDescriptor
EditMeetingDescriptor is a nested class within EditMeetingCommand to facilitate the creation of the edited meeting.
It stores the details to edit the meeting with and each non-empty field value will replace the corresponding field value of the given meeting.
Viewing a Specific Meeting’s Agendas and Notes
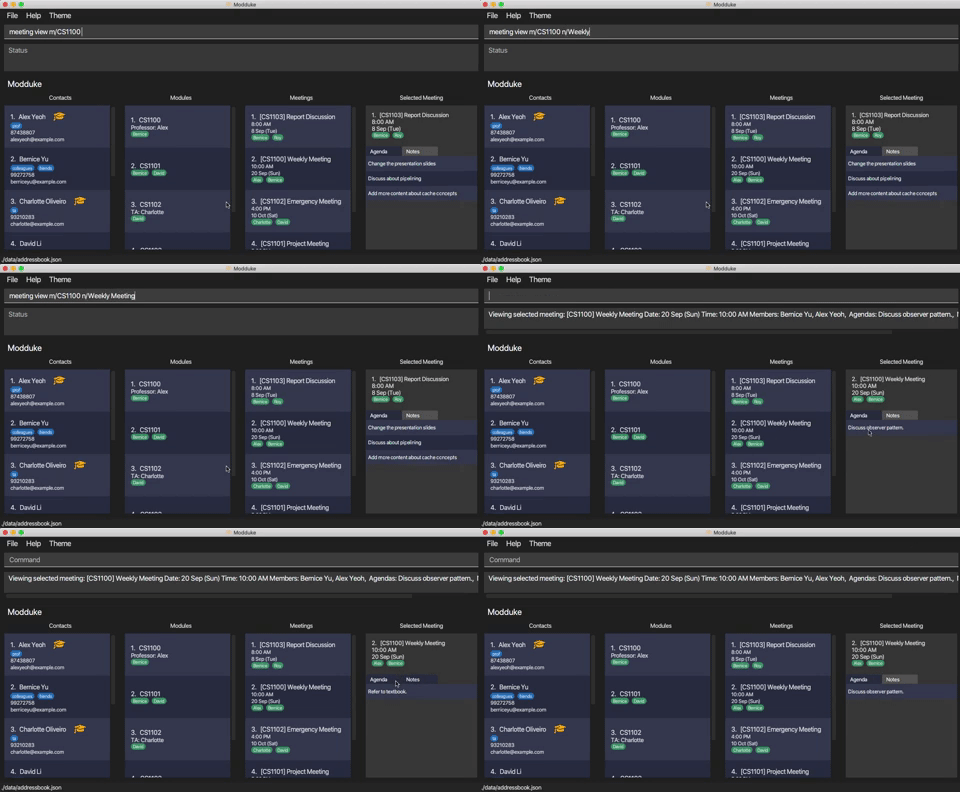
Implementation
The mechanism to view a specific meeting’s agendas and notes is primarily facilitated by the ViewMeetingCommand. It
extends Command and implements the execute operation:
• execute(Model model) - Executes the ViewMeetingCommand on the model, setting the selected meeting to update the
selected meeting field in the ModelManager before creating a CommandResult which triggers a UI update in
MainWindow.
ViewMeetingCommand is the
main command to view the details of a selected meeting, other commands may also trigger UI updates for the selected
meeting. For example, if the module name of the currently selected meeting is updated using the EditModuleCommand,
a UI update will be triggered such that the changes will be reflected in the MeetingDetailsPanel.
More details about this will be explained under design considerations.
As an illustration of the interactions between the different architectural components, given below is the sequence
diagram for the meeting view m/CS2100 n/Report Discussion command execution.
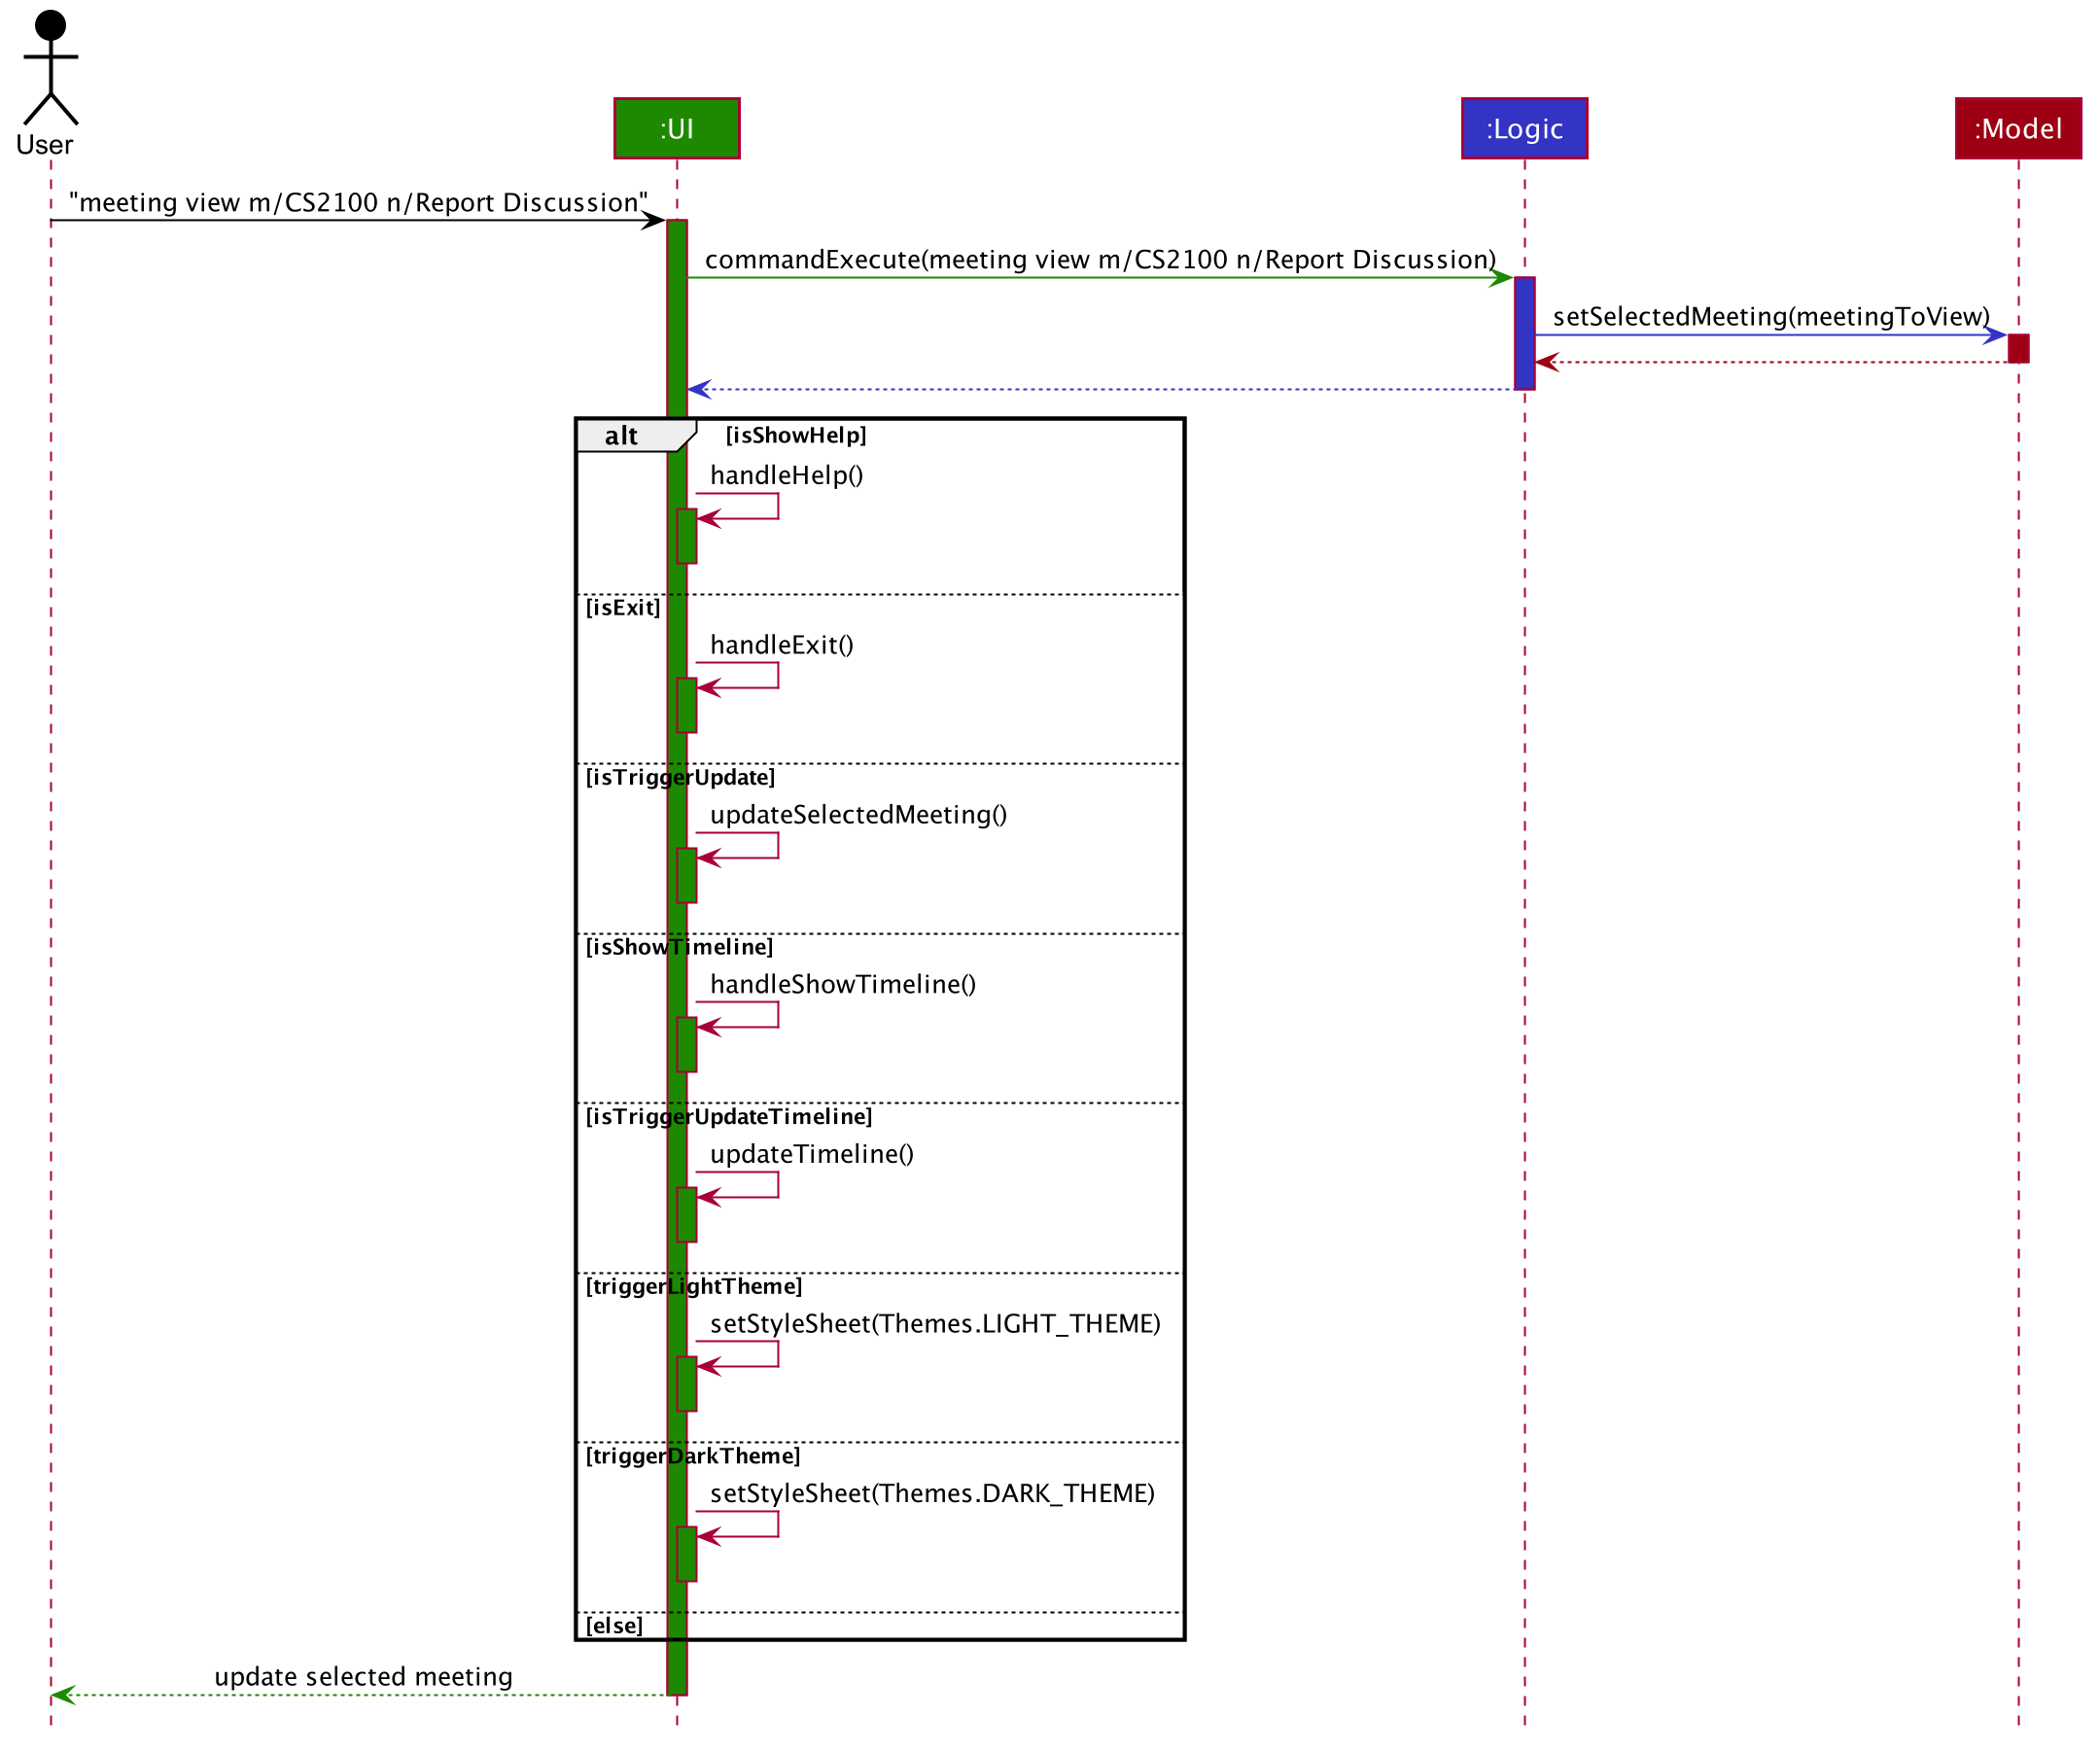
When the Logic signals that an update is required, the following method in MainWindow is invoked to update the
selected meeting user interface:
public void updateSelectedMeeting() {
    logger.info("UI update selected meeting triggered");
    if (logic.getSelectedMeeting() == null && selectedMeetingPlaceholder.getChildren().size() > 0) {
        selectedMeetingPlaceholder.getChildren().remove(0);
    }
    if (logic.getFilteredMeetingList().size() != 0 && logic.getSelectedMeeting() != null) {
        MeetingDetailsPanel selectedMeeting = new MeetingDetailsPanel(logic.getSelectedMeeting(),
                logic.getFilteredMeetingList().indexOf(logic.getSelectedMeeting()) + 1);
        if (selectedMeetingPlaceholder.getChildren().size() == 1) {
            selectedMeetingPlaceholder.getChildren().set(0, selectedMeeting.getRoot());
        } else {
            selectedMeetingPlaceholder.getChildren().add(selectedMeeting.getRoot());
        }
    }
}
Given below is the class diagram representing the structure of this implementation.
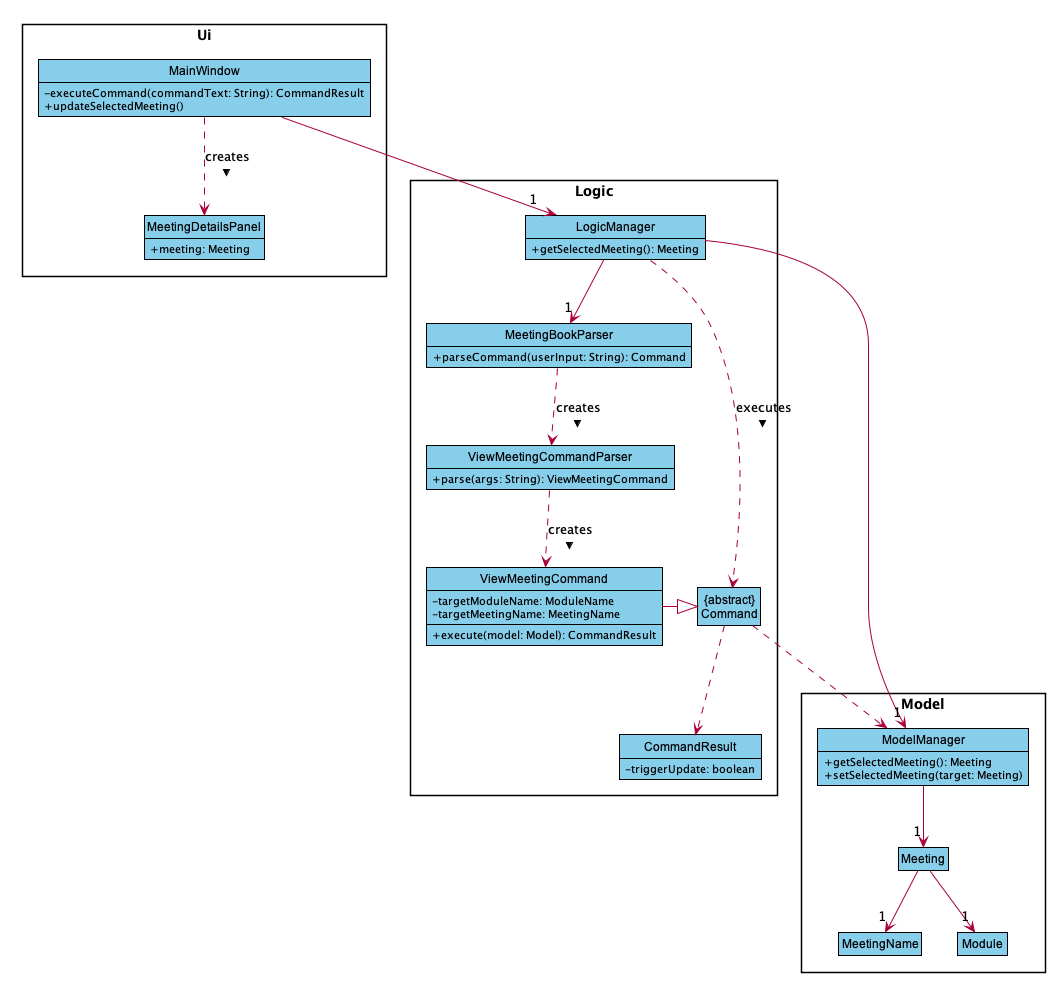
Design Considerations:
Ensuring the UI gets updated whenever information about the selected meeting changes
As mentioned earlier, the SelectedMeeting details can be changed whenever information pertaining to the meeting gets
deleted or edited. These are the following commands that can affect the SelectedMeeting details
(namely all edit and delete commands):
DeleteCommandEditCommandDeleteMeetingCommandEditMeetingCommandDeleteModuleCommandEditModuleCommand
Hence this feature is designed in such a way that whenever any of the above commands are executed, the Ui will be updated accordingly if necessary. Given below is the activity diagram which illustrates the workflow of this process:
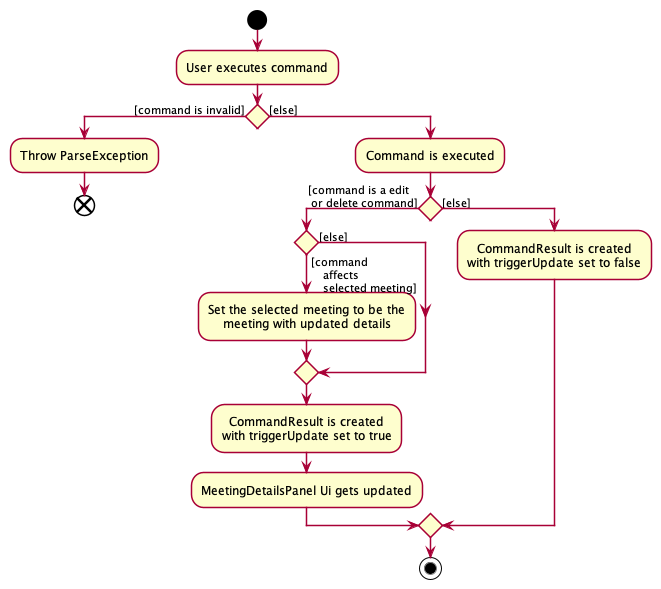
Alternatives considered
-
Alternative 1 (current choice): Boolean flag
triggerUpdateinCommandResult- Pros:
- Ease of implementation. (Simply set the flag to true for commands that need to update the Ui)
- Ease of extension. (Can create additional boolean flags to update other parts of the Ui)
- Cons:
- Need to be wary of all cases (Must remember to adjust relevant commands to set
triggerUpdateto true) - If there are many different Ui components that wish to get updated separately, can end up having many boolean
attributes in
CommandResult
- Need to be wary of all cases (Must remember to adjust relevant commands to set
- Pros:
-
Alternative 2: JavaFX ObservableList
- Pros:
- Built in support for robust observer design pattern. (Don’t have to reinvent the wheel)
- Cons:
- Using a list is not very suitable since
SelectedMeetingis a single value. - Only certain JavaFX views can be used with ObservableList.
- Using a list is not very suitable since
- Pros:
Timeline Feature
The mechanism to display the timeline window is facilitated by TimelineWindow, which extends UiPart.
The components TimelineSection and TimelineMeetingCard help display various sections in the timeline window.
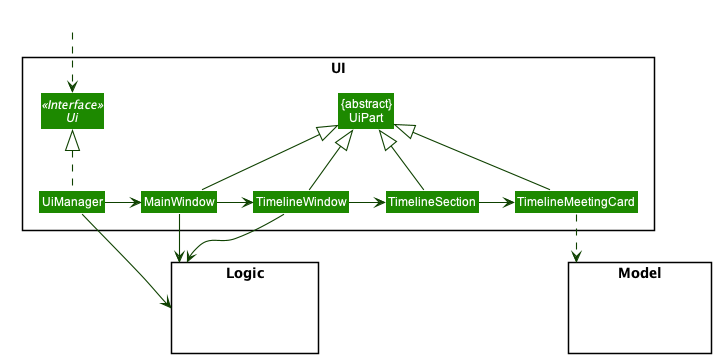
The ShowTimelineCommand triggers the timeline window to be displayed.
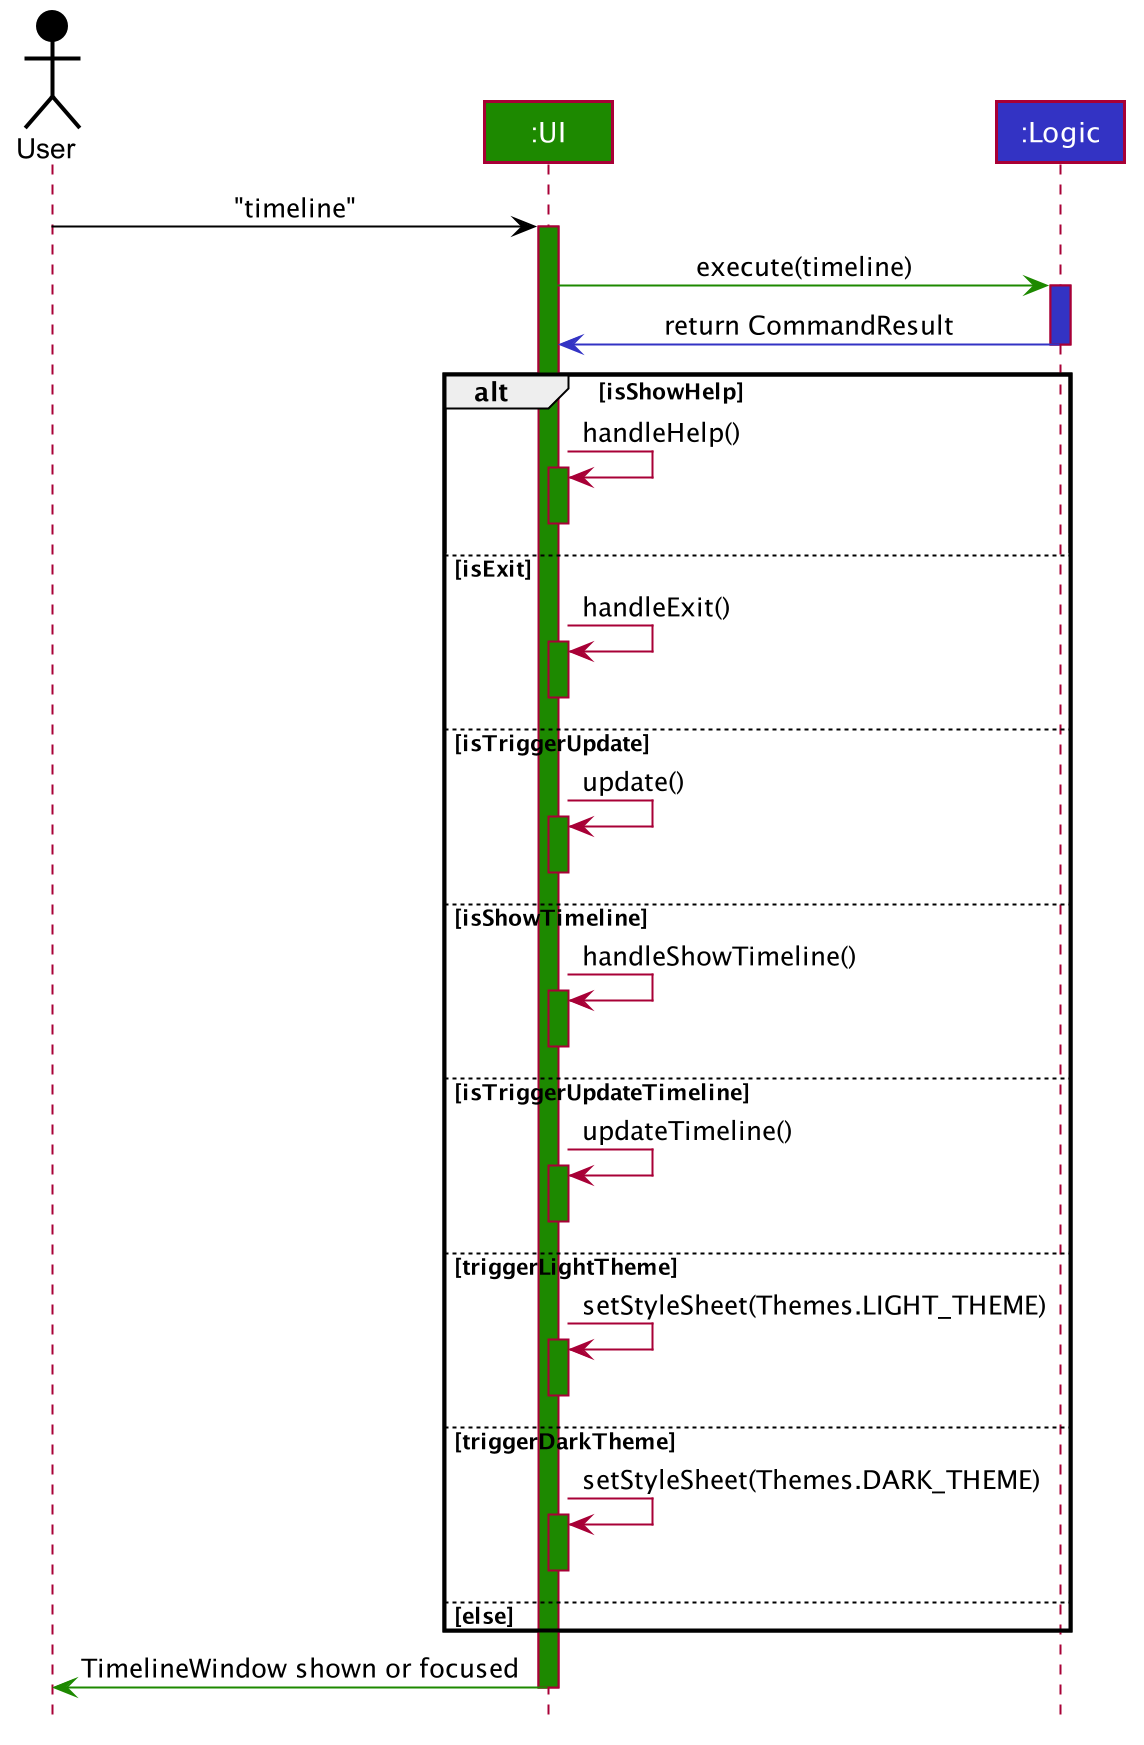
When the Logic signals that the ShowTimelineCommand has been triggered,
the following handleShowTimeline method in MainWindow is invoked to open the timeline window or focus on it if it is already opened.
public void handleShowTimeline() {
    logger.info("UI show timeline triggered");

    if (!timelineWindow.isShowing()) {
        timelineWindow.show();
    } else {
        timelineWindow.focus();
    }
}
Whenever an update has been made to the model that affects any of the components in timeline,
the following updateTimeline method in MainWindow is invoked.
public void updateTimeline() {
    timelineWindow.hide();
    timelineWindow = timelineWindow.updateLogic(logic);
}
The timeline window is hidden if it was open, and a new TimelineWindow object is created to match the new logic component.
The following commands affect the TimelineWindow:
EditCommandDeleteCommandClearCommandEditModuleCommandDeleteModuleCommandAddMeetingCommandEditMeetingCommandDeleteMeetingCommand
Theme switch feature
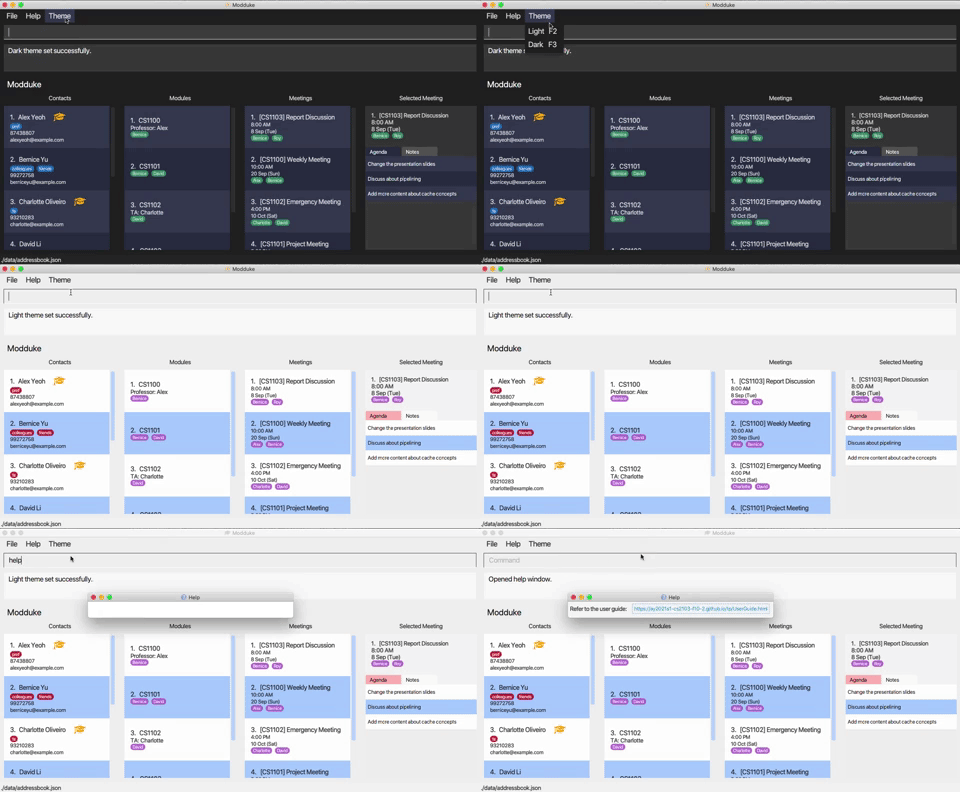
Implementation
The mechanism to view switch to light theme is facilitated by LightThemeCommand while the mechanism to switch to dark theme is facilitated by DarkThemeCommand. Both
extends Command and implements the execute operation. Additionally, the theme switch can also be activated by the F2 and F3 keys or using the mouse to click the menu options.
Given below is the sequence diagram when the light command is entered. The dark command has the same sequence diagram except that light is replaced with dark and setStylesheet(Themes.DARK_THEME) is called instead of setStylesheet(Themes.LIGHT_THEME).
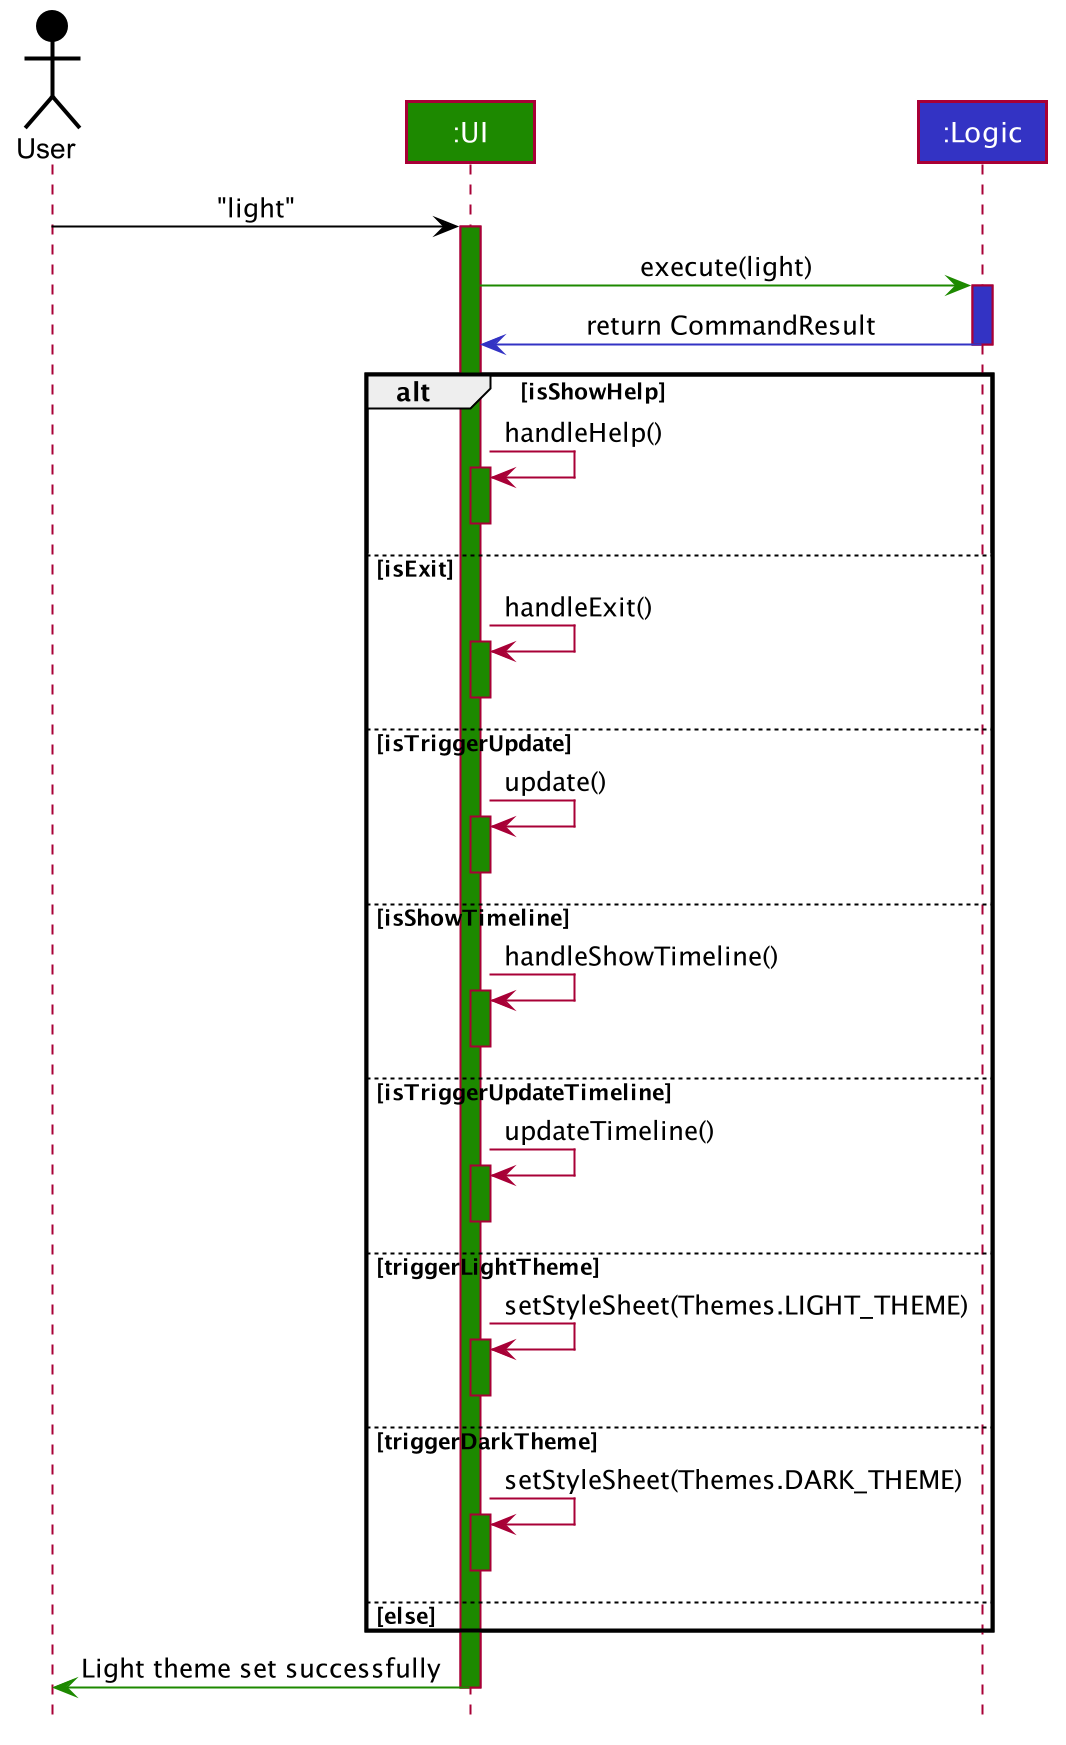
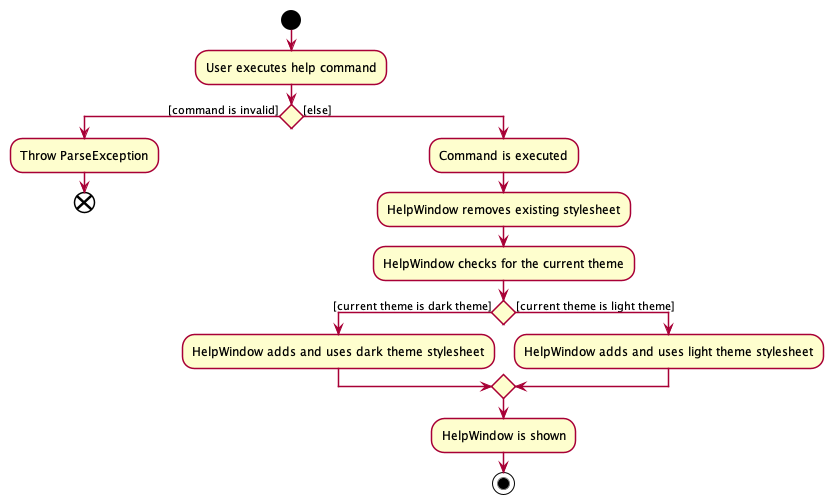
Since the UI has 3 separate windows: MainWindow, HelpWindow and TimelineWindow, these windows need to check the current theme and select the right stylesheet to used. Given below is the sequence diagram when the help command is issued to illustrate how the help window selects the right theme. The other 2 windows follow similar logic.
Documentation, logging, testing, configuration, dev-ops
Appendix: Requirements
Product scope
Target user profile
Anybody → Students → University Students → NUS Students → NUS Students handling multiple projects
- needs to keep track of contacts for various people (Professors, TA, Groupmates)
- needs to schedule school-related appointments
- needs to keep track of the date and time of school-related appointments
- needs to keep track of details of school-related appointments
- prefer desktop apps over other types
- can type fast
- prefers typing to mouse interactions
- is reasonably comfortable using CLI apps
Value proposition:
- seamless contact management which makes it easy to find relevant Professor, TA or Groupmates contacts
- convenient scheduling of project meetings and consultations, making planning a work week effortless
- effective visualisation of schedule and meeting details with the application’s timeline dashboard and selected meeting panel
- enhanced user experience with features such as autocompletion, fuzzy find, command history, copying and theme switching
User stories
Priorities: High (must have) - * * *, Medium (nice to have) - * *, Low (unlikely to have) - *
| Priority | As a … | I want to … | So that I can… |
|---|---|---|---|
* * * |
New user | See usage instructions | Have easy reference when I forget how to use the App |
* * * |
NUS Student | Add contacts of people around me | Find them quickly and ensure that I don’t lose anyone’s contact information |
* * * |
NUS Student | Delete a contact | Remove old or unwanted contacts |
* * * |
NUS Student | Edit an existing contact | Change their contact details if it has changed |
* * * |
NUS Student | View my entire list of contacts | Select who I want to contact |
* * * |
NUS Student | Clear all contacts | Reset my contacts |
* * * |
NUS Student | Tag my contacts based on the individual’s relationship with me (e.g. TA, Professor, Classmate) | Easily identify the contacts relevant to my query |
* * * |
NUS Student | Create meetings for events in my modules such as projects or consultations | I can keep track of commitments and upcoming work |
* * * |
NUS Student | Add relevant contacts in a module to a meeting | Keep track of who is participating in the meeting and their contact information |
* * * |
Forgetful NUS Student | Assign a meeting a timeslot and date | Track exactly when I am supposed to meet |
* * * |
NUS Student with many meetings | View all scheduled meetings | Have an overview of all my meetings |
* * * |
NUS Student with many meetings | View agendas for meetings | Easily review agendas for my meetings |
* * * |
NUS Student with many meetings | View notes for meetings | Take and access notes for my meetings |
* * * |
NUS Student with a changing schedule | Edit meetings | Change the details of my meetings |
* * * |
NUS Student with a changing schedule | Delete meetings | Remove cancelled meetings |
* * * |
NUS Student | Create meetings with professors | Track when I have set up meetings with professors and TA’s |
* * * |
NUS Student taking many modules | Create modules | Add new modules whenever needed |
* * * |
NUS Student taking many modules | Add contacts to a module | Add my classmates contacts to my modules |
* * * |
NUS Student taking many modules | View relevant groups of contacts by modules | I can easily keep track of contact details of individuals in different modules |
* * * |
NUS Student taking many modules | Edit module details | Edit the details of my modules and add new classmates details in when i meet them |
* * * |
NUS Student taking many modules | View contacts based on module | Quickly view the contacts of all my classmates within the module |
* * * |
NUS Student taking many modules | Delete a module | Delete the module and all meetings related to the module at the end of the semester |
* * |
Lazy Typist | Be able to autocomplete my commands | Reduce time spent writing commands |
* * |
Lazy Typist | Be able go back to previous commands if I need to repeat them | Reduce time spent writing commands |
* * |
User with easily strained eyes | Switch between light and dark mode | Reduce eye strain when using the application during different times of the day |
* |
NUS Student | Hide private contact details | Minimize chances of someone else seeing them by accident |
* |
Student who likes to personalise stuff | Customise the layout of the App | I can organise relevant information in personalised way that I find easy to access |
Use cases
(For all use cases below, the System is the Modduke and the Actor is the user, unless specified otherwise)
UC01: Add a Contact
MSS
- User requests to add a contact to the list
- Modduke adds the contact
Use case ends.
Extensions
-
1a. Name, phone number or email field is missing.
-
1a1. Modduke shows an error message.
Use case ends.
-
-
1b. Contact with the same name already exists.
-
1b1. Modduke shows an error message.
Use case ends.
-
UC02: Delete a Contact
MSS
- User requests to list contacts
- Modduke shows a list of contacts
- User requests to delete contacts matching the given parameters in the list
- Modduke deletes the contacts
Use case ends.
Extensions
-
2a. The list is empty.
Use case ends.
-
3a. Any of the given parameters are invalid.
-
3a1. Modduke shows an error message.
Use case resumes at step 2.
-
UC03: Edit a Contact
MSS
- User requests to list contacts
- Modduke shows a list of contacts
- User requests to edit a specific contact in the list
- Modduke edits the contact
Use case ends.
Extensions
-
2a. The list is empty.
Use case ends.
-
3a. No optional field is provided.
-
3a1. Modduke shows an error message.
Use case resumes at step 2.
-
-
3b. The given name is invalid.
-
3b1. Modduke shows an error message.
Use case resumes at step 2.
-
UC04: View Contacts
MSS
- User requests to list contacts
- Modduke shows a list of contacts
Use case ends.
Extensions
-
2a. The list is empty.
Use case ends.
UC05: Find Contacts
Same as View Contacts Use Case except only contacts that match the given parameters are listed.
UC06: Tag a Contact
MSS
- User requests to list contacts
- Modduke shows a list of contacts
- User requests to tag a specific contact in the list
-
Modduke tags the contact
Use case ends.
Extensions
-
2a. The list is empty.
Use case ends.
-
3a. The given name is invalid.
-
3a1. Modduke shows an error message.
Use case resumes at step 2.
-
-
3b. No tags are provided.
-
3b1. Modduke shows an error message.
Use case resumes at step 2.
-
UC07: Delete Tags of a Contact
MSS
- User requests to list contacts
- Modduke shows a list of contacts
- User requests to delete tags of a specific contact in the list
- Modduke deletes the specified tags of the contact
Use case ends.
Extensions
-
2a. The list is empty.
Use case ends.
-
3a. The given name is invalid.
-
3a1. Modduke shows an error message.
Use case resumes at step 2.
-
-
3b. No tags are provided.
-
3b1. Modduke shows an error message.
Use case resumes at step 2.
-
UC08: Clear all Contacts
MSS
- User requests to clear all existing contacts.
- Modduke deletes all existing contacts.
Use case ends.
UC09: Add Module
MSS
- User makes request to add a module
-
Modduke accepts request and creates module
Use case ends.
Extensions
-
1a. Module Name or Participants are missing.
-
1a1. Modduke shows an error message.
Use case ends
-
-
1b. Given module already exists within Modduke
-
1b1. Modduke shows an error message.
Use case ends
-
-
1c. One or more of the given Participants do not exist in Modduke
-
1c1. Modduke shows an error message.
Use case ends
-
-
1d. Given module name is invalid
-
1d1. Modduke shows an error message.
Use case ends
-
UC10: Edit Module
MSS
- User makes request to edit a module
- Modduke accepts request and edits module
-
Modduke updates Meetings of the module
Use case ends.
Extensions
-
1a. Module Name is missing.
-
1a1. Modduke shows an error message.
Use case ends
-
-
1b. Optional Fields (New name/ Participants) are missing.
-
1b1. Modduke shows an error message.
Use case ends
-
-
1c. Edited module already exists within Modduke
-
1c1. Modduke shows an error message.
Use case ends
-
-
1d. One or more of new Participants do not exist in Modduke
-
1d1. Modduke shows an error message.
Use case ends
-
-
1e. Edited module name is invalid
-
1e1. Modduke shows an error message.
Use case ends
-
UC11: Delete Module
MSS
- User makes request to delete a module
- Modduke accepts request and deletes module
-
Modduke deletes all the meetings of the given module.
Use case ends.
Extensions
-
1a. Module Name is missing.
-
1a1. Modduke shows an error message.
Use case ends
-
-
1b. Provided module name does not exist in Modduke.
-
1b1. Modduke shows an error message.
Use case ends
-
UC12: Module List
MSS
- User makes request to list contacts of a module
-
Modduke accepts request and lists contacts
Use case ends.
Extensions
-
1a. Module Name is missing.
-
1a1. Modduke shows an error message.
Use case ends
-
-
1b. Provided module name does not exist in Modduke.
-
1b1. Modduke shows an error message.
Use case ends
-
UC13: Add Meeting
MSS
- User makes request to add a meeting
-
Modduke accepts request and creates meeting
Use case ends.
Extensions
-
1a. Module Name, Meeting Name, Date, Time or Participants are missing.
-
1a1. Modduke shows an error message.
Use case ends
-
-
1b. Given module does not exist in Modduke.
-
1b1. Modduke shows an error message.
Use case ends
-
-
1c. Meeting with the same combination of module and meeting name already exists.
-
1c1. Modduke shows an error message.
Use case ends.
-
-
1d. Meeting with the same date and time already exists.
-
1d1. Modduke shows an error message.
Use case ends.
-
-
1e. Participants indicated are not in given module.
-
1e1. Modduke shows an error message.
Use case ends.
-
UC14: Delete Meeting
MSS
- User makes request to delete a specific meeting
-
Modduke accepts request and makes changes to meeting
Use case ends.
Extensions
-
1a. Specified combination of module and meeting does not exist.
-
1a1. Modduke shows an error message.
Use case ends
-
UC15: Edit Meeting
MSS
- User makes request to edit a meeting
-
Modduke accepts request and edits meeting
Use case ends.
Extensions
-
1a. No field to edit was provided.
-
1a1. Modduke shows an error message.
Use case ends
-
-
1b. Given module does not exist in Modduke.
-
1b1. Modduke shows an error message.
Use case ends
-
-
1c. Specified combination of module and meeting does not exist.
-
1c1. Modduke shows an error message.
Use case ends
-
-
1d. Edited meeting has the same combination of module and meeting name as an existing meeting.
-
1d1. Modduke shows an error message.
Use case ends.
-
-
1e. Edited meeting results in the same date and time as an existing meeting exists.
-
1e1. Modduke shows an error message.
Use case ends.
-
-
1f. New participants indicated are not in given module.
-
1f1. Modduke shows an error message.
Use case ends.
-
UC16: View Selected Meeting Details
MSS
- User chooses to view details of a meeting
-
Modduke accepts request and displays both agendas and notes for the selected meeting
Use case ends.
Extensions
-
1a. Modduke detects invalid command format.
-
1a1. Modduke gives an alert for the invalid command format.
Use case ends
-
-
1b. User enters a meeting that does not exist.
-
1b1. Modduke shows a message informing user that the meeting provided is not in the meeting list.
Use case ends
-
UC17: List Meetings
MSS
- User makes request to list all meetings
-
Modduke accepts request and displays all meetings
Use case ends.
UC18: View Timeline
MSS
- User makes request to view timeline window
-
Modduke accepts request and displays timeline window
Use case ends.
UC19: Copy Contact Information
MSS
- User makes request to copy information of contacts matching the given parameters
-
Modduke accepts request and copies information of contacts to the user’s system clipboard
Use case ends.
Extensions
-
1a. No contact matches the given parameters.
-
1a1. Modduke shows an error message.
Use case ends
-
-
1b. No parameters are given.
-
1b1. Modduke shows an error message.
Use case ends.
-
UC20: Autocomplete Entity Name (Contact, Module, Meeting)
MSS
- User makes a request to system to trigger autocomplete.
- Modduke accepts request and enters autocomplete mode and request for text to be autocompleted
- User specifies text to autocomplete.
- Modduke takes user input and returns list of suggestions to user.
- User selects his desired suggestion from list.
-
Modduke replaces user’s text with autocomplete result.
Use case ends.
Extensions
-
4a. No suggestions available for text entered
-
4a1. Modduke shows an empty suggestions list
Use case resumes from step 3.
-
*a. At any time, User chooses to exit autocomplete mode.
- *a1. User makes a request to Modduke to exit autocomplete mode.
-
*a2. Modduke accepts request and exits autocomplete mode.
Use case ends.
-
-
UC21: Switch to light theme
Guarantees
- The theme set will be light theme regardless of current theme
MSS
- User makes request to switch to light theme
-
Modduke switches to light theme
Use case ends.
UC22: Switch to dark theme
Guarantees
- The theme set will be dark theme regardless of current theme
MSS
- User makes request to switch to dark theme
-
Modduke switches to dark theme
Use case ends.
UC23: Command History
MSS
- User makes request to view last inputted command
-
Modduke updates text field with last inputted command
Use case ends.
Extensions
-
2a. No inputted command in current session
-
2a1. Modduke does nothing
Use case ends.
-
Non-Functional Requirements
- The product should only be for a single user rather than multi-user.
- A user with above average typing speed for regular English text (i.e. not code, not system admin commands) should be able to accomplish most of the tasks faster using commands than using the mouse.
- Increments to the code should be made every week with a consistent delivery rate.
- The data should be stored locally and should be in a human editable text file, instead of using a DBMS.
- The software should follow the Object-oriented paradigm primarily.
- Should work on any mainstream OS as long as it has Java
11or above installed. - Should work without requiring an installer.
- Should be able to function without having to rely on being heavily connected to a network.
- The use of third-party frameworks and libraries should be avoided.
- JAR files should not exceed 100Mb and PDF files should not exceed 15Mb/file.
- All features should be easy to test. (i.e., do not depend heavily on remote APIs, do not have audio-related features and do not require creating user accounts before usage)
- The system should respond within two seconds.
Glossary
- Mainstream OS: Windows, Linux, Unix, OS-X
- Private contact detail: A contact detail that is not meant to be shared with others
- .vcf,.csv files: A format of files that contains contact information from users phones
- CLI: CLI is the Command Line Interface where you can type in commands and get an output
- TA: Teaching assistant
- Meeting: A general purpose appointment between students, professors or TAs. Examples include project meetings or consultations with professors.
Appendix: Instructions for manual testing
Given below are instructions to test the app manually.
Launch and shutdown
-
Initial launch
-
Download the jar file and copy into an empty folder
-
Double-click the jar file Expected: Shows the GUI with a set of sample contacts. The window size may not be optimum.
-
-
Saving window preferences
-
Resize the window to an optimum size. Move the window to a different location. Close the window.
-
Re-launch the app by double-clicking the jar file.
Expected: The most recent window size and location is retained.
-
Copying a contact’s information
-
Copying a contact while all contacts are being shown
-
Prerequisites: List all contacts using the
contact listcommand. Multiple contacts in the list. -
Test case:
copy phone n/Alex Yeoh
Expected: Clipboard should have phone number of Contact Alex Yeoh. -
Test case:
copy email t/colleagues
Expected: Clipboard should have email addresses of all Contacts with colleague tag. -
Test case:
copy email m/CS1100
Expected: Clipboard should have email addresses of all Contacts in the CS1100 Module. -
Test case:
copy email n/Alex Yeoh n/Bernice Yu t/prof m/CS1102
Expected: Clipboard should have email addresses of Contacts Alex Yeoh and Bernice Yu, all Contacts with the prof tag and all Contacts in the CS1102 Module. -
Other incorrect copy commands to try:
copy email,copy email n/x(where x is a name not in the list of contacts),copy phone t/y(where y is a tag not in the list of contacts),copy phone m/z(where z is a module not in the list of modules)
Expected: Status message will be an error message.
-
Autocomplete Feature
-
Trigger Autocomplete Mode
- Enter ‘cn/’ into command box.
Expected: Text should turn orange
- Enter ‘cn/’ into command box.
- Generating Suggestions
Assuming you have a contact named “Alex Yeoh”, else feel free to use any prefix you like given that the contact exists- Type in “alex” and press
Tab
Expected: Modduke should return a suggestion from your contact list. If there are multiple suggestions, suggestions should be offered alphabetically.
- Type in “alex” and press
- Locking in a Suggestion
- Press
Enterto lock in your suggestion
Expected: ‘cn/’ should be removed. Text should change back to white.
- Press
Fuzzy Find Completion (Fzf) Feature
- Trigger Fzf Mode
- In the command box, press
Ctrl+Space
Expected: A menu should pop up given that user has atleast 1 entry in either Contact, Module or Meeting.
- In the command box, press
- Generating Suggestions
- Type some text
Expected: The menu should show suggestions that contain given text. If text enter by user is not empty but has no appropriate suggestions, menu should be hidden.
- Type some text
- Navigating Suggestions
- Use
UporDownarrow keys to navigate suggestions
Expected: User should be allowed to navigate suggestions.
- Use
- Locking in a Suggestion
- Press
Enterto lock in your suggestion
Expected: Menu should be removed and the result should appear in command box.
- Press
Viewing a selected meeting details
-
View a selected meeting’s agenda and notes
-
Prerequisites: Meeting is a valid meeting.
-
Test case:
meeting view m/CS1100 n/Weekly Meeting
Expected: Selected meeting panel should display the correct meeting. User can toggle between viewing the meeting’s agenda or notes by clicking on the corresponding Agenda or Notes tab.
-
Change to light theme
-
Switch the application theme to light theme
- Test case:
light
Expected: Application should switch to light theme and status message should say “Light theme set successfully.”
- Test case:
Change to dark theme
-
Switch the application theme to dark theme
- Test case:
dark
Expected: Application should switch to dark theme and status message should say “Dark theme set successfully.”
- Test case: